
Oval Wire & Bead Statement Earrings: My Stitch Fix Knock-off
What’s better than buying a great pair of earrings? Figuring out how to make them way cheaper! Remember the other day I shared with you the latest box I got from Stitch Fix? One of the items was a really pretty pair of statement earrings that Ioved but refused to pay $42 for. There was only one thing to do…return them and then make my own version! Here’s how…

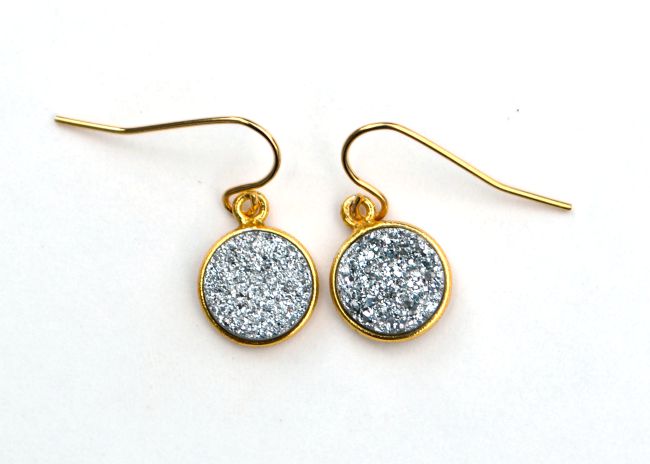
Before I get started with the tutorial, let me remind you of what the inspiration looked like:
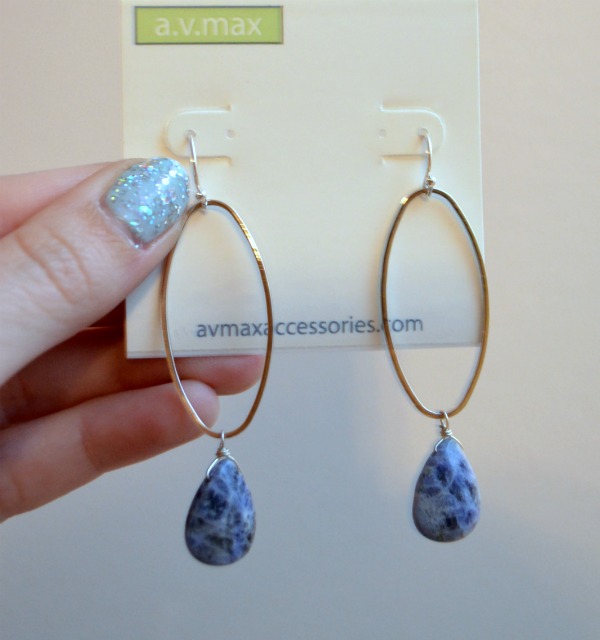
They were simple metal ovals with wire wrapped briolettes dangling from them. There are two ways you can go about making something like this design. The first way is the easiest; you simply purchase large metal ovals in the jewelry section of your local craft store or online. Then, you add an ear wire and a bead, and they’re ready to go!
I had two problems with taking that route. The first was that I wanted my ovals to be a little fancier and have some texture to them. The second was that I didn’t have any metal ovals already on hand and was too lazy and impatient to either go to the store or wait for an online retailer to ship them. So, I decided to create my own ovals out of 12 gauge wire. Here’s a list of all my supplies:
Materials:
{Some of mine were provided by Goody Beads…thanks!}
– 12 gauge wire
– super glue
– texture hammer {mine was checkered blocks}
– steel stamping block
{If you’re going to buy your ovals, all you need are those plus the supplies listed below}
– 2 ear wires
– 2 head pins
– 2 beads
– jewelry pliers and wire cutters

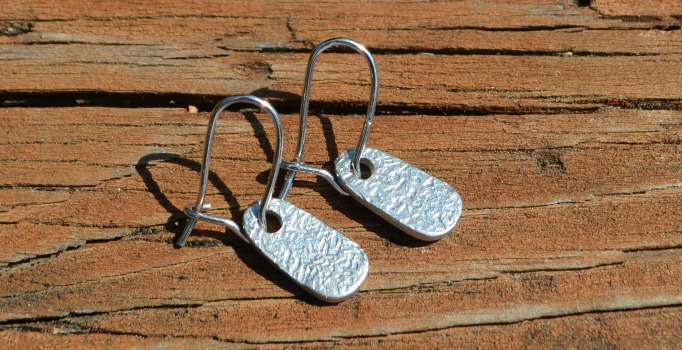
Step 1: I found an oval object {a pendant} the size I wanted my wire loops to be and used that as a guide to bend and shape my wire into two almost-identical ovals.
Step 2: I placed the ovals one at a time on my stamping block and hammered them flat using a texture hammer.
Step 3: Since I didn’t want my ovals to come apart or fall off the ear wires, I used just a tiny bit of super glue to hold the cut ends together.
 Step 4: Place each bead on a head pin and form a simple wire loop. Attach the loop directly to your oval. If you use a jump ring, then the oval will go one direction and your bead will turn the other when you wear them. If you’ve never done beading before, never fear, start here with my Beading 101 Tutorial!
If you want yours to look even more like the inspiration piece, you can use a top drilled teardrop shaped bead. I didn’t do that on mine because I particularly love these shell beads, and because I didn’t have any thin gold wire to use for the wire wrapping. Remember, I’m too lazy to go to Michaels and too impatient to order any.

Step 5: Attach an ear wire to the top of each loop. Now they’re ready to wear!

I’m so thrilled with the way they turned out…I’m loving them even more than the originals! I think it’s the texture on the ovals…makes them twice as fun! What do you think? Is it a good attempt at a knock-off? For the record, as I mentioned earlier, I refused to go to the store for any supplies, so all of this was already in my stash. Which means it cost me a whopping $0. Obviously, I bought the wire, the beads, etc. at various times, but I bet the supply cost totaled less than $10, maybe even less than $5. A whole lot better than $42, don’t you think?


I think you made a great knock-off and you can’t beat the price of cheap or free over $42. Plus, instead of having to settle for whatever the designer thinks you want, you can personalize these as much as you want so every pair is unique.
Gorgeous!! I have all of this stuff here to do this!!
Look beautiful!! Much better than spending $42 for the other ones. Awesome!!
very pretty!! I love the blue!
Love your replication and your price tag!!! Great job!
What a neat idea! Thank you for sharing