
Fuseworks Microwave Kiln: Making Glass Jewelry in Your Microwave
I hope you’re sitting down for this, friends. Microwaves aren’t just for popcorn and frozen dinners anymore. Today, I’ve got a major game changer for you. Honestly. Yesterday, I used my microwave to reheat leftovers. Today, I used a microwave and made this.

Wait, what? You made a glass ring in your microwave? Why yes. Yes, I did. How in the world…? I’m so glad you asked. Let me introduce you to an amazing little thing called the Fuseworks Microwave Kiln. Mine was provided by Darice Crafts, and I actually got the whole Fuseworks Fusing Kit for Beginners. It contains everything you need to learn to fuse glass safely at home; a microwave kiln, fusing glass, confetti glass, millefiori glass, gold and silver earrings and bails, kiln paper, a glass cutter, hot mitts, and easy to follow instructions.
 So, how does this work? Let me show you. {Disclaimer: if you get one, which you should, you definitely need to read the full manufacturer’s instructions too, to make sure you get all the info!} Now, come join me in the Artsy Basement and learn how I made my pretty ring.
Step 1: Cut and stack your glass. I used the cutter included in my kit to score a piece of dichroic {read: shiny and iridescent with a cool pattern} glass and a piece of black glass. At this point, one should really have a set of Glass Running Pliers to get the scored glass to cut nicely and without injuring the person who decides to try breaking it by hand. Just saying.
Step 2: Pull out your Elmer’s glue and attach your dichroic glass on top with the pretty side facing up.
Step 3: Cut a piece of kiln paper and place it on the bottom of the kiln, then place your project on top. Note: the little part is the bottom, the larger part is the top. Which is opposite what you might initially think and you may almost do a very bad thing by trying to microwave this sucker upside down. Again, just saying.
Step 4: Place the lid on top and heat based on the manufacturer’s instructions. For my piece in my microwave, I heated for 4 minutes on high power, but be sure to adjust it based on your own microwave wattage.

As the kiln heats up, you’ll see a red glow coming through the hole in the top. When it changes to orangeish/yellowish you know the fusing process is taking place. When it gets more yellowish, your project is probably finished. Mine never turned as yellow as I thought it might, but it was in fact finished.
Step 5: Remove your kiln from the microwave while wearing heat resistant gloves. Sit it on a heat resistant surface and keep it closed for 30 minutes. That. is. so. hard. I’m so impatient and I totally just wanted to rip the lid off and look at my piece, but trust me, don’t do it. You don’t want to crack the glass or otherwise interrupt the process.

Step 6: Remove the lid. Let the piece cool completely, which could take another 30-40 minutes, before removing it from the kiln. This. is. even. harder. At this point, you can see how pretty it is and you’re just ready to play with it and turn it into something you can wear or use, but instead you have to walk away. Le sigh. Just a quick note here, hot glass looks exactly like cool glass…so don’t try assuming it’s probably cool enough to touch as soon as you take the lid off. It really does need to cool because it really is still hot. Honestly. Ask me how I know.

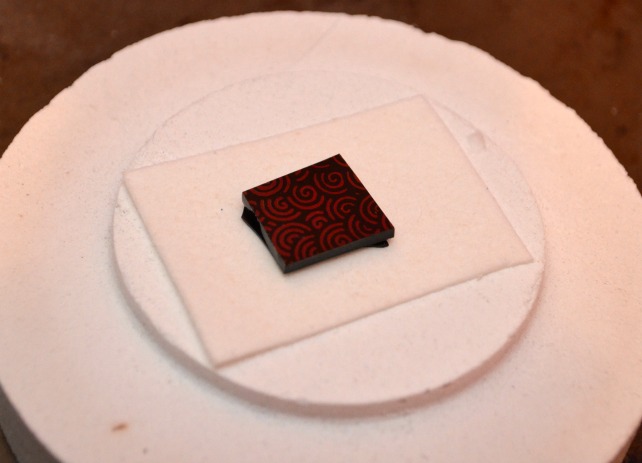
Here’s what my piece looked like after firing, while it was cooling down. Once it’s finally cool enough to remove from the kiln, it may have fibers from the kiln paper stuck to the back. Just run it under a little bit of cold water and they’ll wash right off.

Step 7: File any sharp edges. You can see in the photo above that my piece had a few sharp and pointy corners. All I did was take a brand new nail file and use that to smooth and round them off. This is surprisingly effective, but will pretty much destroy that file, so have a few inexpensive ones on hand that you don’t mind dedicating just to your glass projects.
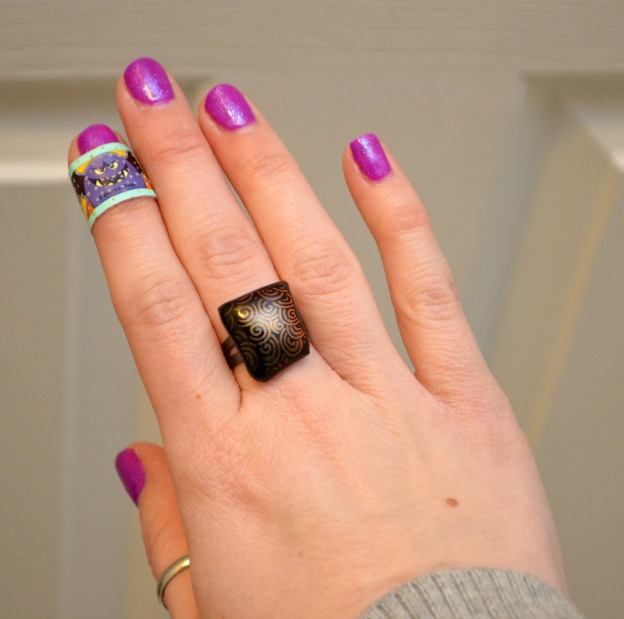
Step 8: Attach your piece to a ring base, bail, or other finding. I chose to turn mine into a ring because I absolutely love big statement rings that draw attention. You could just as easily make it a pendant, put it on a bobby pin, make it a lapel pin, or do anything else you wanted.

Ta-da! My ring is complete! I thought about modeling it on my other hand, but then I remembered we play the honestly game around here. So, you get my, “I was a dufus who forgot glass is sharp and I scratched myself only to realize the only Band-aids in the house are Monsters Inc.” photo. Rawr.
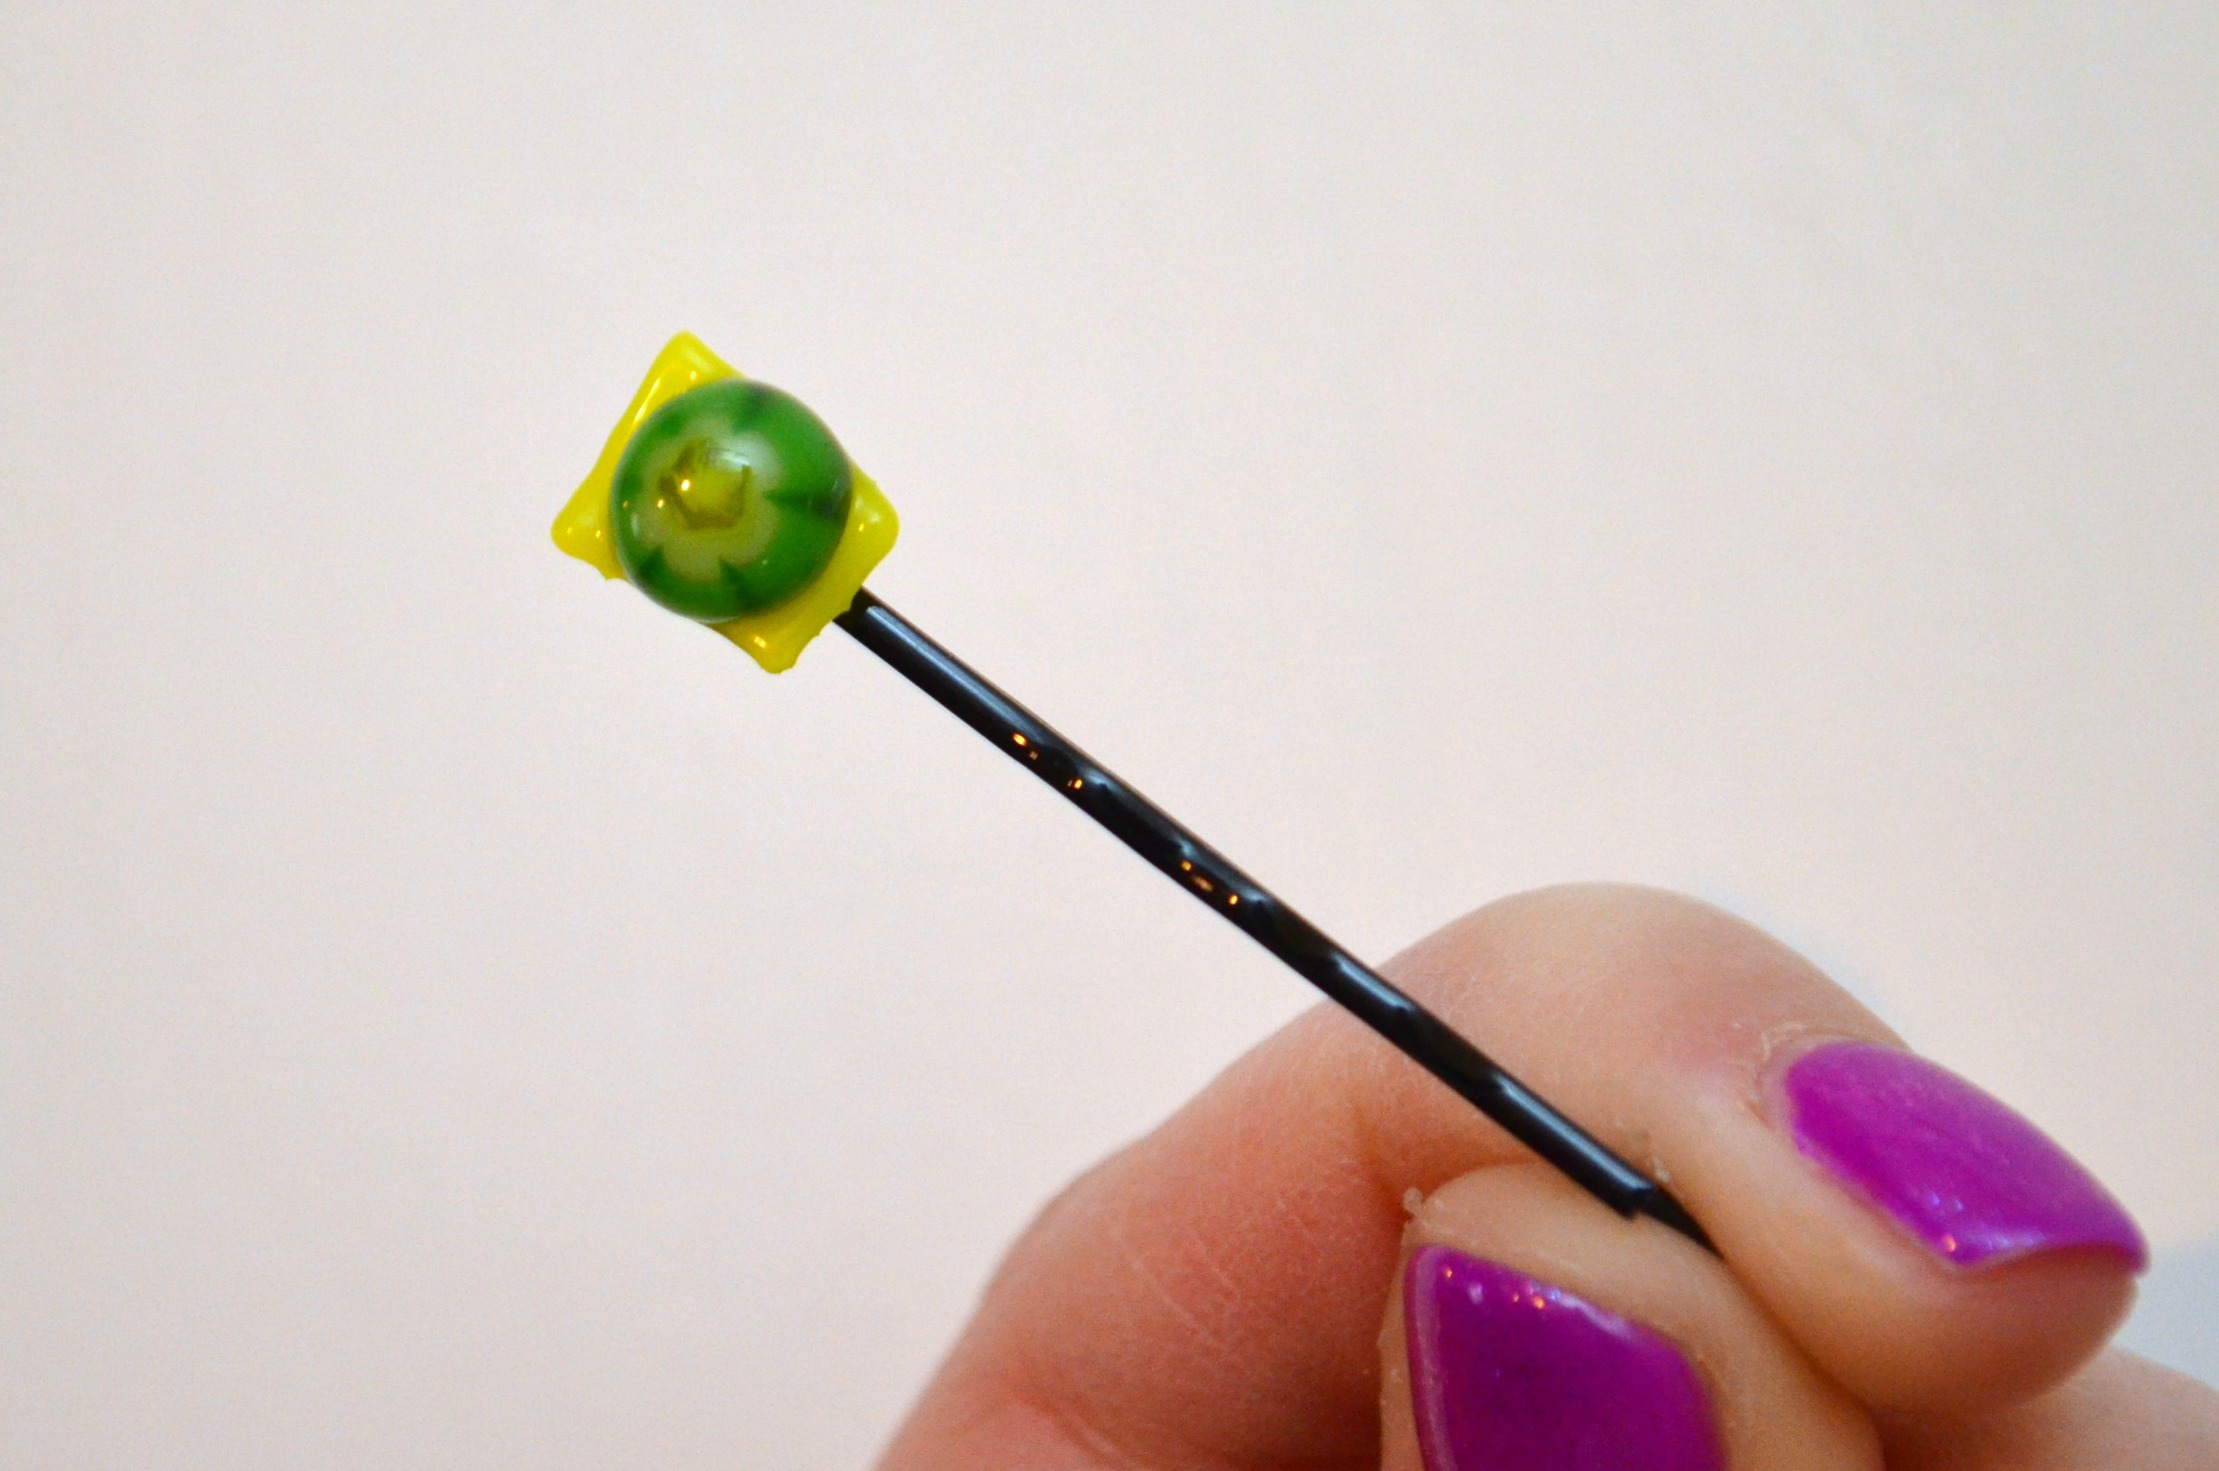
This piece was actually the third thing I fused. The first time, I was just testing things out, so I fused a piece of millefiori to a small piece of confetti glass. It’s not my most artistic piece, but I stuck it on a bobby pin anyway.
My second attempt was a piece of turquoise dichroic glass that I apparently overheated because it turned grey. That’s the one I cut myself on. Fail. But, the third time’s a charm, because i’m thrilled with how this piece turned out!

I’ll be totally honest with you, I was equal parts excited and freaked out to try this new “toy” of mine. I was intimidated by it, but as it turns out, it was really quite easy to do. And, now that I have the hang of it, I’m excited to move on to some more projects that I’m sure I’ll be sharing with you soon! It’s a lot of fun, and I’m still pretty amazed that this gorgeous piece came out of a microwave. For the record, I did not {nor should you} use the same microwave you actually cook food in. I bought a $25 microwave on sale at Walmart to dedicate just for this purpose. But it’s just awesome to think that I can fuse glass and make my own glass jewelry right here in my house! I don’t have to go to a special studio, I can do it on my time, on my terms, in my pajamas if I want. Very cool. So, stay tuned for more Fuseworks projects! Are you as impressed with the Fuseworks Microwave Kiln as I am?


So pretty and soon we will be showing you other fun jewelry making at AMR Jewelry Boutique.
This is gorgeous! I..MUST…..TRY…..FUSING…GLASS!!!
Wow! This is pretty cool!
That’s really cool! I’ve never seen these before, but I love the idea of being able to make these in your microwave! Pinning.
That is so unbelievably cool! Your pieces turned out beautifully. I had no idea a microwave kiln existed, and now you’ve got me wanting one to play with. And honestly, I prefer fun bandaids over plain ones. If you’re gonna patch yourself up you might as well do it in style.
Thanks so much, Analisa! 🙂 It really is fun…you totally should get one and play around with it too! And now you’ve got me thinking about a line of designer bandaids…haha.
I really love the ring, and the concept of making your own jewelry is cool. Also love the band aid! Monster’s University is a great choice.
Haha, thanks…LC thinks so too.
That’s amazing!! The ring is beautiful! I can’t wait to see what else you make 🙂
This is awesome! I really want to do this, but with moving to another state soon and not having a random extra microwave, it’ll have to wait. 🙂 So glad you got to try it. I’d seen it at Joann’s a few times and was curious! Thanks for the info!
What a cool tool, Amy! And I love the ring you made – very chic!
Goodness! Can you imagine how excited my 2 teen daughters will be with this? And you need to stock up Hello Kitty bandages (that’s what I did, not intentionally, though 🙂
This is so incredibly cool! Love how your ring turned out! 🙂
Very cool! I would be pretty intimidated with this, too. I love all your “…and don’t do ____ or ____ will happen.” Nothing teaches like experience, huh? 🙂
Amy that’s incredible. I’ve never fused glass period but I might have to try it out if I can do it in my microwave!
This is so cool! I love the idea of fusing glass at home. So much fun!
What a cool kit. Definitely going to check this out. Thanks for sharing!
SO cool!! The ring is beautiful!! Thanks for sharing!
SO.Much.fun!!!! LOVE this! I’m dreaming of earrings galore! Would it be heavy for earrings?
This is SO cool! I love love love it!
That’s such a cool idea! My daughter and her friends would love it! I will have to go check it out!
This is sooooo cool. I had no idea you could this in a microwave. Amazing. Your ring turned out so pretty!!
I took a glass fusing class this semester in college and I would not recommend using elmers glue. Instead, go get a squirt bottle of hairspray and spray it in between the layers of glass. This works great!!!