Silhouette Specialty Media Promotion!
So, I think this month’s Silhouette Promotion is my favorite one yet! I’m soooo excited to tell you guys about this one and share my projects with you! Here it is:
You guys, I’m not kidding, this specialty media package that comes with the bundles is out of this world! It’s the same exact set of goodies I got to play with, and I may or may not have literally squealed out loud when I opened my box. The creative possibilities are absolutely endless, but I’m going to try my best to post several projects this week that show you different ways to use some of these products! Here’s a peek at what you get if you purchase a bundle this month:
(1) Cameo Bundle – $269.99 (savings over $120 from retail cost $383.90)
You get a Silhouette Cameo cutting machine plus the following list of specialty media.
(2) Portrait Bundle – $129.99 (savings over $110 from retail cost $263.90)
You get a Silhouette Portrait cutting machine plus the following specialty media:
· 1 cardstock essentials pack (new product: 12 sheets of adhesive 12×12 cardstock, 4 each of black, white, warm and cool grey)
· 1 pack printable adhesive kraft paper (new product)
· 1 pack printable clear sticker paper
· 1 pack temporary tattoo paper
· 1 pack printable cotton canvas (new product)
· 1 pack chipboard
· 1 pack printable silver foil
· 1 pack printable magnet paper
· 1 pack double-sided adhesive
Wow! I mean, seriously! So. much. fun. stuff! Already have a machine? You’re still in luck; take 30% off all specialty media you buy!
When I first dug into my box, I was honestly slightly overwhelmed and didn’t know where to start! But, it wasn’t long before I picked an idea and ran with it. Here’s the first of my projects using some of my new Silhouette “toys”.

Here’s how I did it. You’ll need:
– an empty and clean glass bottle with lid
– Printable Silver Foil
– Adhesive cardstock
– ribbon
– scissors
– flower {optional}
– printer, Silhouette cutting machine, Silhouette software
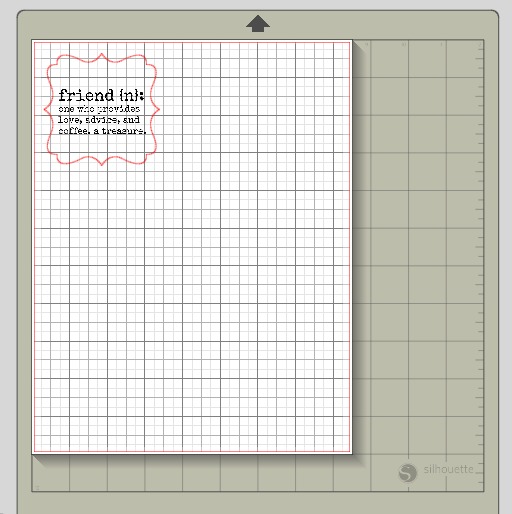
Step 1: Create “friend” definition and open it in your Silhouette Designer Edition Software.
I made mine in PicMonkey. You can create your own, making it personalized, or you can feel free to use mine! Just right click the image and “save as” to your computer.

Step 2: Position the image where you want it in your software, load your printable silver foil into a printer and print the definition onto it.

Step 3: Without moving the text, add a label shape and size it to fit your text. Cut with your Silhouette. Be sure to choose “printable foil” in your cutting settings and change your blade to the recommended setting, 5.
Step 4: Peel the label from its backing and adhere to your bottle. Come on, how fun is that?!

Step 5: Measure your lid. In your software, draw and cut a circle from adhesive backed cardstock that will comfortably cover it. I used the warm grey, which looks like brown to me, because it went with “coffee colors.” Peel and stick!
How easy is that?! Bye-bye, logo of company I’ve given all kinds of love to but who doesn’t want to work with me on anything, ever. Ahem. I digress.

Step 6: Tie on a cute coordinating ribbon. Add a flower or button accent if you like!

Step 7: Give to a friend! Oh, I guess I forgot the “fill with coffee” part. Do that too. 🙂 Otherwise, your friend will be like, “Oh look! What a nice, um, bottle…” while thinking, “Where the heck is my coffee?”

This project was absolutely simple to make! All I had to do was cut, peel, and stick, and I had a really cute and thoughtful {I think, anyway!} gift idea! Which I’m giving to a friend who is letting me borrow her extra car {!!!} while we wait {and wait and wait} for ours to get fixed from our little rear-ending incident. Thanks, Laura! Hope you like your present!
As for the rest of you, if you want something to get excited about, hop on over to Silhouette and fill up your cart with this Specialty Media! I’ve got more projects coming your way that are going to show you how much you *need* this stuff! For real! When you open that box, it’ll be like your birthday only better because you don’t have to be another year older, you just get to play with new fun toys! Oh, and don’t forget, use ARTSY to get your discount {I do make a small commission on sales with that code, so you’re helping fund LC’s education}!
Hugs & Glitter,
So fun! I have not made the leap yet to purchasing this little machine, but I am very close after I see such great projects like this one 🙂
I have got to get my Cameo out, this is such a cute project!!
Laura will definitely LOVE her gift! This is so thoughtful, and I seriously need to make a bunch and just keep them on hand. Thanks for the inspiration! (Oh, and clever way to hide that label on the top! Genius.)
Neat project!
What a cute idea!
Thanks, TaMara!!
I keep crossing my fingers that I’ll win one of these from someone, and you made me cross my fingers even harder! Cute project!
Thanks for being a part of the Daily Blog Boost!
Good luck, Brooke!
So glad you’re using those Starbucks bottles again. I love this idea for neighbor gifts or even just thank you gifts for my playgroup girls. Thanks Amy!
Lol, Britni…I have so many of them, I have to do SOMETHING with them, right? 🙂