Paint-A-Pillow {and a Giveaway}!
Thanks to Paint-A-Pillow for sponsoring today’s post and giveaway; as always all opinions, bad jokes, and general silliness are honestly my own.
I’ve got some exciting news today for those of you who love easy DIY home décor! I’m sure you’ve heard of Cutting Edge Stencils…they now have a sister company called Paint-A-Pillow that specializes in making it super simple to create your own DIY Designer pillows to brighten up your bed, your couch, and even your outdoor furniture!

If you follow One Artsy Mama on Facebook {which you should, or else you’re missing a lot of fun!} you know that our family is in the process of packing and moving to a new home by the end of next month. A new house is the perfect reason to spruce up your décor, so I jumped at the chance to review a Paint-A-Pillow kit and make a pretty accent pillow! Here’s how the kit works.

Each kit includes the following pieces:
- Stenciling frame
- Reusable pillow stencil of your choice
- 17”x17” Cotton pillow cover in your choice of white or natural
- Pillow insert: linen/down alternative
- Mini roller and stencil brush
- Paint tray and stirring stick
- Illustrated instructions
- Free mini stencil and practice fabric swatch
- One free fabric paint of your choice
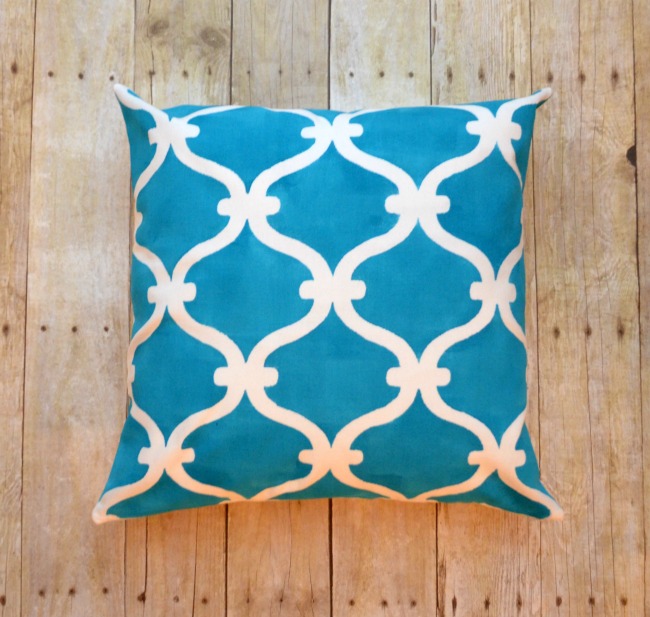
When the kit arrives, the stencil and pillow cover are already assembled inside the stenciling frame as shown in the photo above. It’s literally ready to be painted; all you have to do is stir your paint, pour it onto the tray, and get started.
Step 1: Load your mini-roller evenly with paint. Make sure that the roller looks completely covered and not stripey. Test it on the little scrap of fabric to get a feel for how it applies. The paint is thinner than acrylic or multi-surface paint, so if that’s what you usually work with, you’ll want to try it out and get an idea of how it covers.
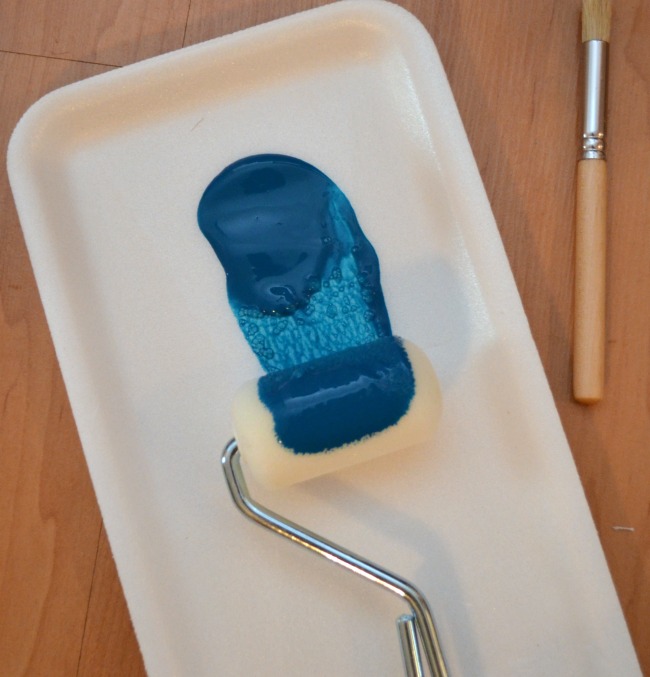
Step 2: Roll your pillow cover using light to medium pressure. If you press too hard, the paint can bleed under the stencil, which is no fun at all, so keep it gentle. Since the stencil is clear, you can easily see whether your paint is staying where it’s supposed to or not. Make sure you cover the stenciled areas evenly. You may want to use the small brush for the edges, although I found that the only spot I really needed it was the bottom right corner near the zipper.
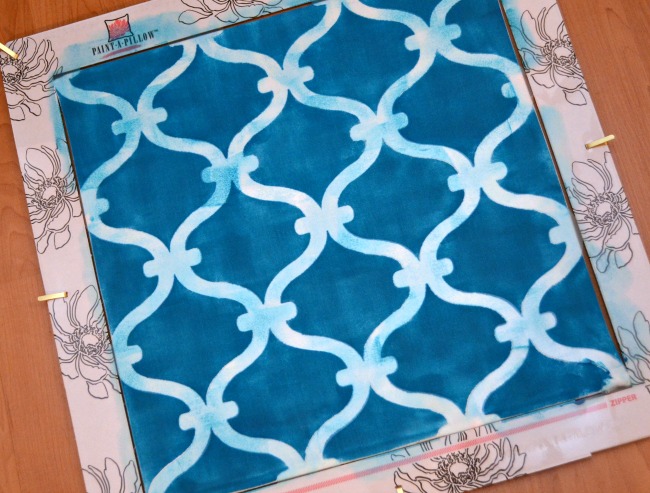
I’ll be honest…I was kind of 50/50 before I did this project whether it would turn out awesome or be a disaster. I’ve had my share of fails when it comes to stenciling, so I just wasn’t sure how well it would work. Let me tell you, I was so pleasantly surprised when I took off the stencil and saw how great it looked!
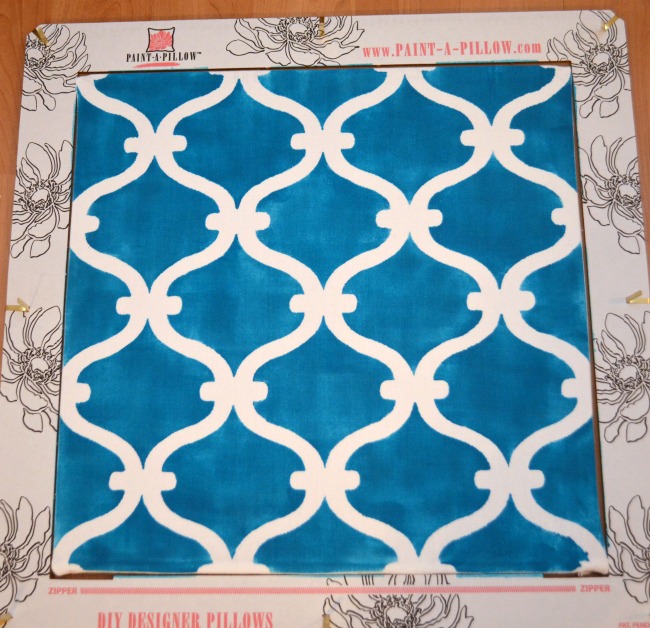
Step 3: Unfasten the metal holders and carefully remove the stencil. It’s easily washable with soap and water, so you can clean it off for next time. In the meantime, place your pillow cover in a safe place to dry completely. Don’t remove the cardboard until it’s totally dry. {You can speed up the drying process with a hairdryer or fan if you’re in a hurry}. I put mine way up on top of the china cabinet so curious Ms. Fuzzy couldn’t get her paws on it…trust me, she tried. While I was stenciling, no less. Gotta love pets…
Step 4: {optional} If you plan on washing your pillow or using it outdoors, you’ll want to take a minute to do the extra step of heat setting your paint. All you have to do is place a piece of cloth over top and iron for 30 seconds. I am going to be using my pillow indoors, but I did heat set it anyway because I have a six-year-old…which means eventually it will take a trip through the washing machine.
Step 5: Unzip the cover and put the pillow insert inside! Just a note: when the kit arrives, the pillow will look super flat because it’s vacuum sealed in its packaging. I looked at it and wondered how in the world it was ever going to look like a legit pillow, but lo and behold, as soon as I opened the plastic bag, the pillow puffed right up to its normal size!
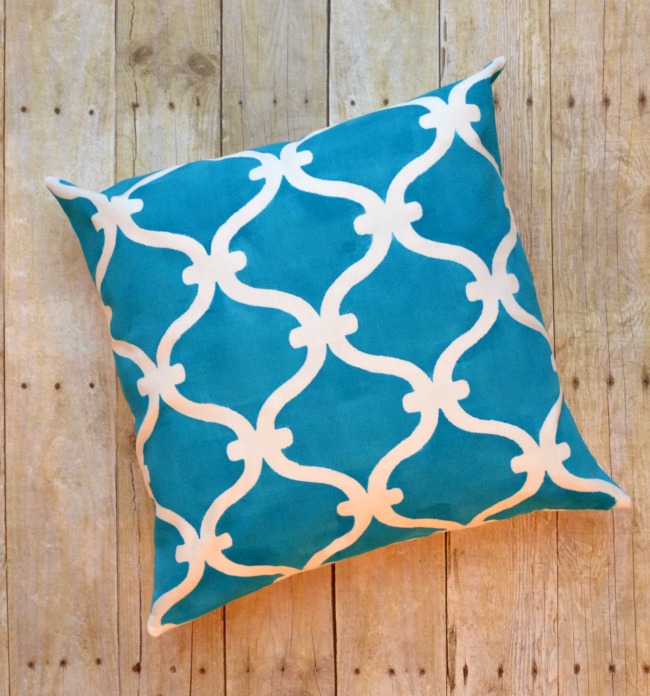
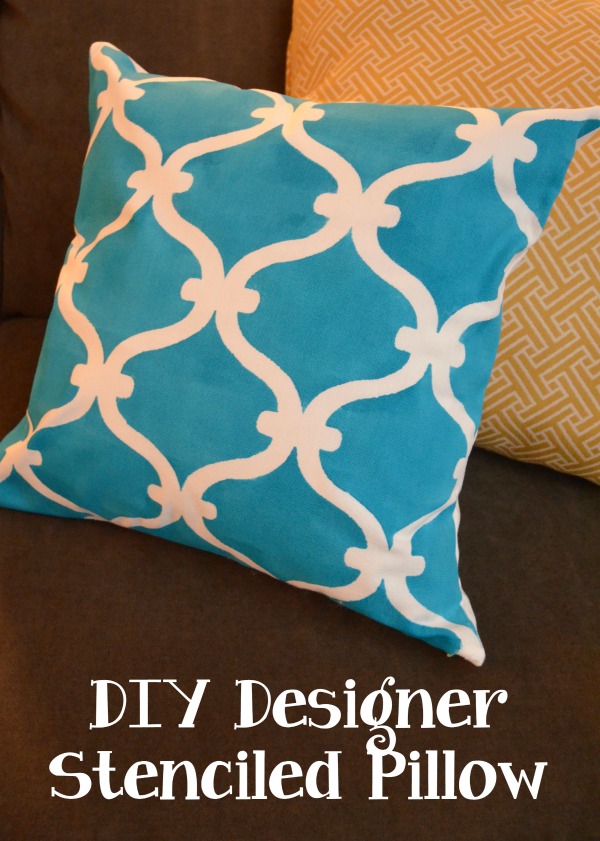
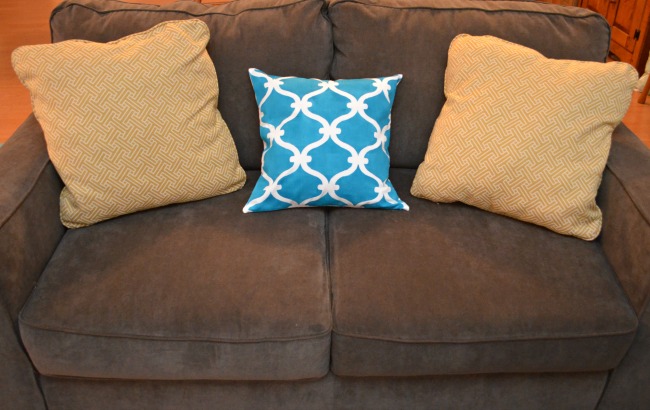
Now you’re ready to put your pillow on display! What do you think? I’m having trouble deciding whether to put it in the living room or the master bedroom because it perfectly coordinates in both places! Guess I’ll have to make another one… Speaking of which, after you buy a kit, you can also purchase stencils, paint, brushes and rollers, pillow covers, pillows, and more individually. That way, if you want to make more, you can buy just the things you need and don’t have to purchase another entire kit.
Look like fun? Want to try it? Paint-A-Pillow is offering one lucky reader a kit containing everything you need to make the pillow of your choice. Rafflecopter will walk you through the entry process below; good luck!
This is so fun – I love the Sophia Trellis stencil. Simple, elegant & gorgeous. I love the way your pillow turned out – such a fun pop of color!
I love the Funky Wheel Pattern. I can never decide on one color, so this has it all!
I love the hedgehog paint-a pillow kit
I love it! I like the Tribal Arrows Paint-a-Pillow Kit.
Love the one you picked, I’m a bit obsessed with Chevron so would go with that one.
I love the butterfly stencil pillow. Its so beautiful. I love the idea of making my own accent pillow.
You do fabulous work. I can’t enter all since my twitter account is all messed up! So hopefully I still have a shot with the couple of things I could enter.
I love the Mermaid Paint-a-Pillow Kit!
I love the hummingbird pattern!
I’m thinking my daughter would like the Outside the Box modern pillow kit. She’s young, hip and certainly thinks differently than her ol’ mama!
Starfish is my favorite summer-beach themed stencil.
Archery arrows for anytime…boy do I need pillows:) And I’ve been itching to try painting my own fabric:) Thank you for inspiring me!
I love the Alessa Scroll Paint-a-Pillow Kit
Thanks for sharing you experience with this. It looks like fun! I like the Birch Forest pattern.
Your pillow turned out so cute!! There are so many cute pillows to choose from. I love the CASABLANCA pillow kit!
http://paintapillow.com/index.php/stencils-for-accent-pillows/fuji-stencil-for-pillow-kit.html Fuji is cool.
They have so many great choices! I’d chose the BIRCH FOREST PAINT-A-PILLOW KIT
Love the forest stencil. Thank you for the giveaway.
My daughter and I are in love with the hedgehog!
[email protected]
Lol, who wouldn’t be?!
Love these pillows!!!!!!! [email protected]
They have so many cool patterns! Neat company!
I like the Lily scroll stencil
My favorite is Birds In The Trees.
I love the color and design you chose, it really makes the brown sofa pop…..I have a hard time sprucing up my brown sofa and so far just have a color throw over the back….a colorful pillow like this would really work. I’d love the coral stencil.
Any of the Damask patterns would look amazing in my living room.
So unique and fun!
I love the Nature pattern!
i love the Tuscan Trellis pattern. It’s nice and clean, without being too busy. 🙂 This looks like a fun project!
I can’t decide between Sweet dreams and Alexa.
I think the Hedgehog pillow would be fun to make!
I like the colors chosen for the Heritage stencil
I like all the damask patterns and the candy canes and snowflakes. So many of the animals are cute, too, especially the hedgehogs.
I love the Wild Berry Damask stencil.
I love these pillows and they would work great as quilt blocks or on shirts! I really like the HUMMINGBIRDS PAINT-A-PILLOW.
Love the “Stephanie’s Lace” Stencil!! These are alllll Awesome tho! Very hard to pick just one! lol
I love the Peacock stencil! My sister’s wedding has a peacock theme and I’d love to make a pillow that she can have as a memento.
The Fish school!
MOROC-N-ROLL PILLOW STENCIL … or anything Damask. This is a great post…I had NO IDEA this product existed.
I like the Metro stencil
I think my fave is the rooster but there are several cool ones.