Dictionary Page Pendants
Last week, I had the exciting opportunity to guest post over at Crafty, Scrappy, Happy and to co-host Jaime’s fabulous Thursday linky party. {By the way, if you haven’t linked up yet, click here to share your latest projects…can’t wait to see what you’ve been up to!}
Anyway, I shared this tutorial for how to make a dictionary page pendant. Just in case you missed it, here’s how you can make a fun, one of a kind piece of jewelry that’s totally personalized. It’s a great idea for Christmas gifts…
DICTIONARY PAGE PENDANT
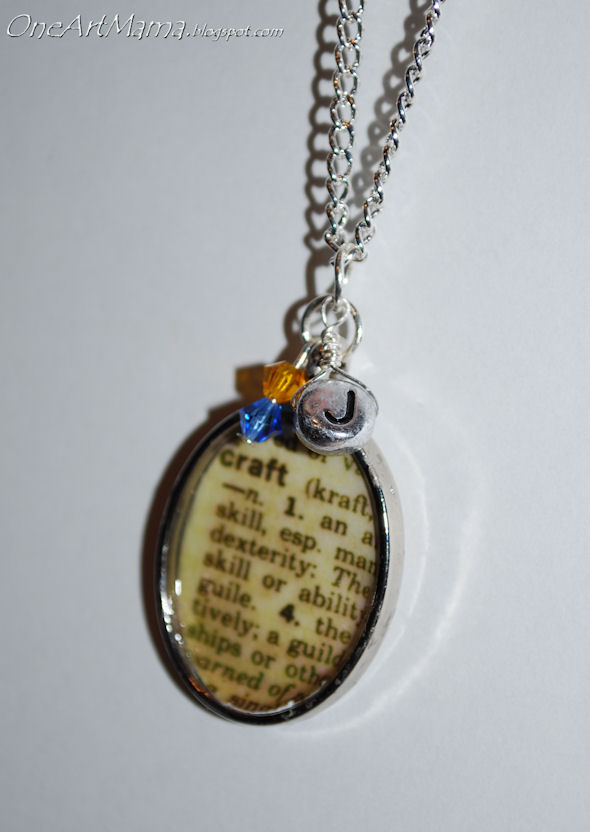
The necklace you see pictured is the one I made as a thank-you gift for Jamie since she was kind enough to share her blog and party with me!

Materials:
dictionary
camera
printer/photo paper/photo software
beveled pendant
Mod Podge Dimensional Magic {I loooove this stuff!}
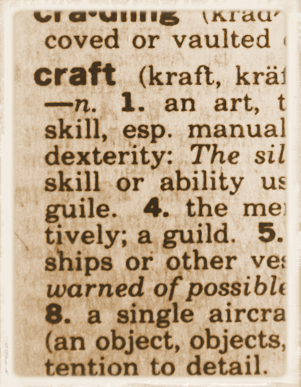
First, I had to choose a dictionary page and get it in printed form. I didn’t want to cut up our actual dictionary, so I did the next best thing.

I photographed the page I wanted. I chose the definition for “craft.” I really wanted “crafty,” but the way it fell on the page, the word was at the bottom of one column and the definition was at the top of the next. Alas. I got a little grumpy with this part because the flash blurred the words, but no flash gave me this dark image. But, I knew I could fix it up with a little editing.

Then, I used my trusty Corel Paint Shop Pro X2 software to crop it to the size I needed, brighten it, boost the contrast, and apply a Time Machine effect.
I printed the image on matte photo paper, then trimmed it to fit inside my beveled pendant. A little bit of Mod Podge on the bottom holds it in place.

Then, the fun part! I squeezed one of my favorite supplies, Mod Podge Dimensional Magic, all over it to fill in the pendant. Don’t worry, although it looks cloudy now, it dries totally clear!
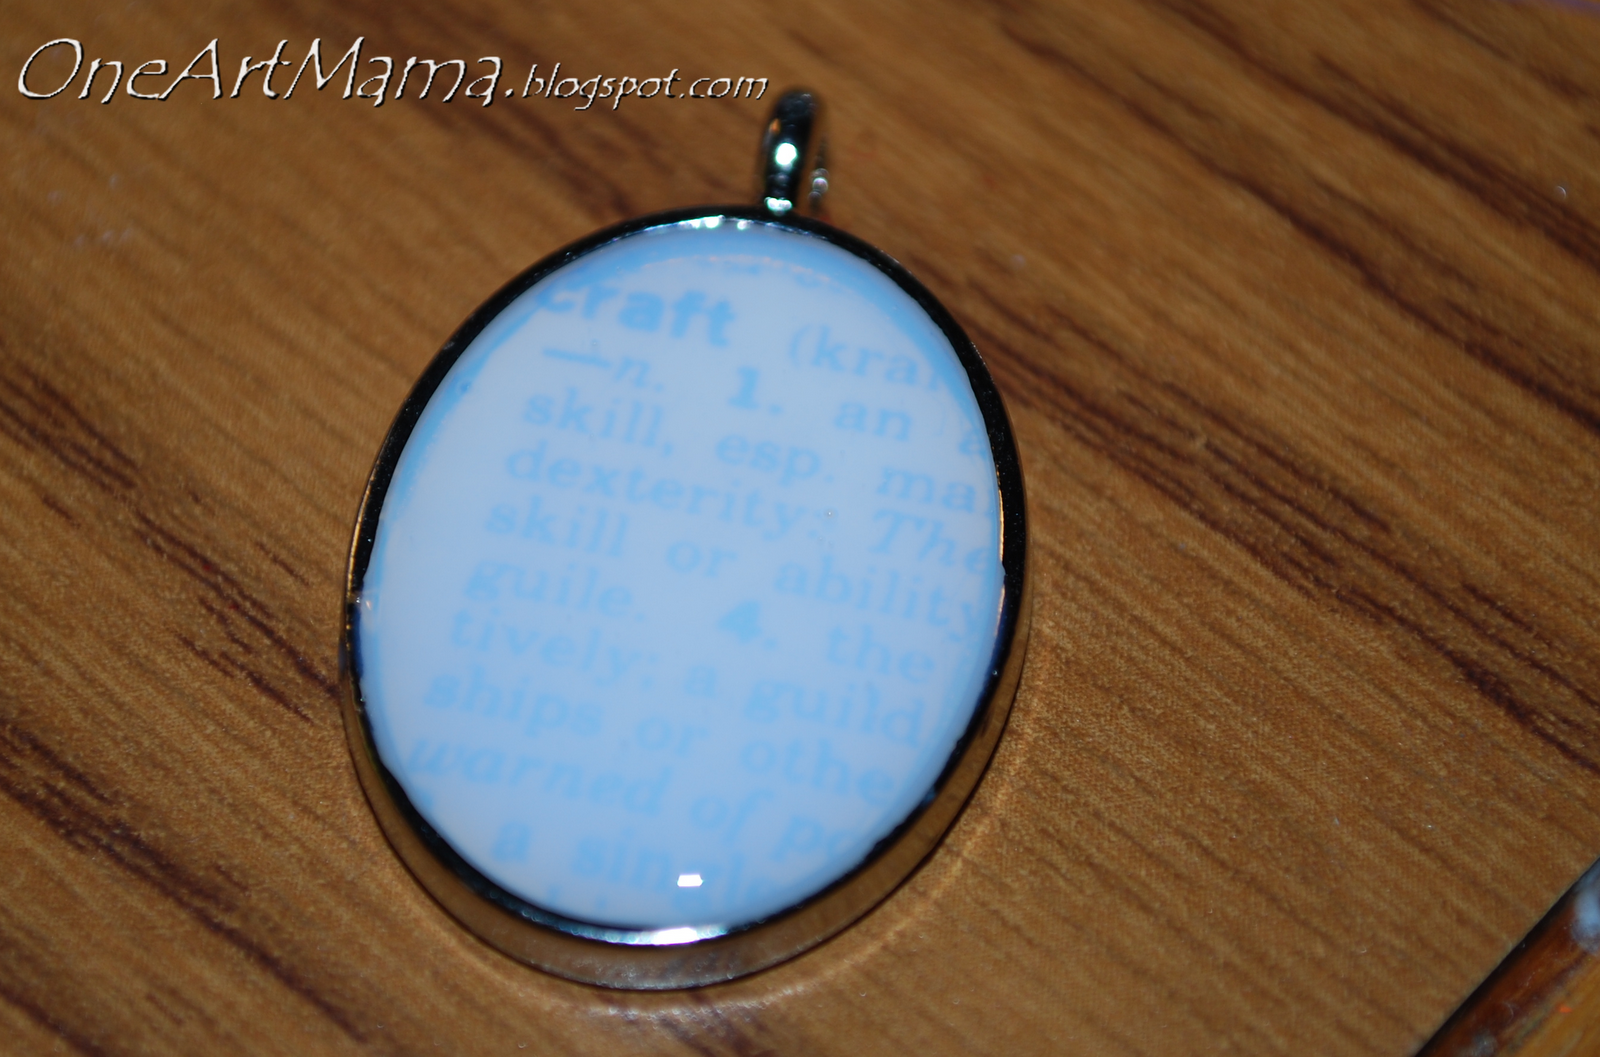
At this point, all you have to do is let it dry and then add a chain and you have a finished pendant!
Or, if you’re an advanced {or adventurous} jewelry maker, you can get a little fancy.
While I waited for it to dry, I did a few other things to make it extra snazzy.
Optional Materials to jazz it up a bit:
crystals: your choice of colors
head pin
initial bead
26 gauge wire
jump rings
chain and clasp
jewelry pliers: needle nose and flat
wire cutters
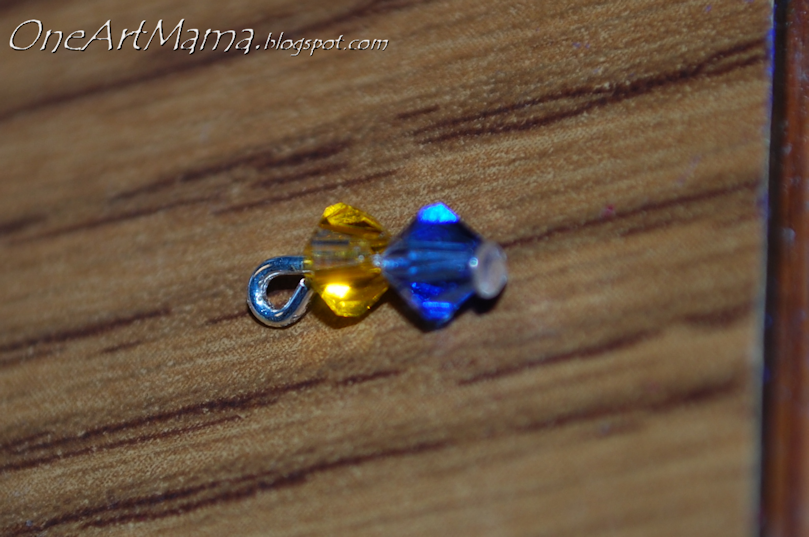
First, I decided to add some color using crystals. I chose blue and yellow since they match the CSH blog theme. I put them on a head pin, bent it 90 degrees, and trimmed it to about the length of my smallest fingernail.
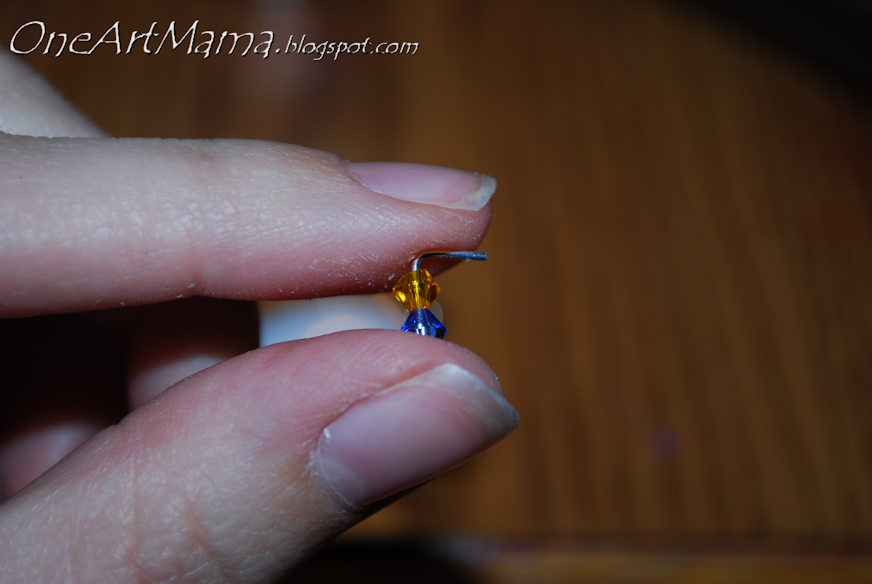
Then, I used needle nose jewelry pliers to bend the wire into a loop.
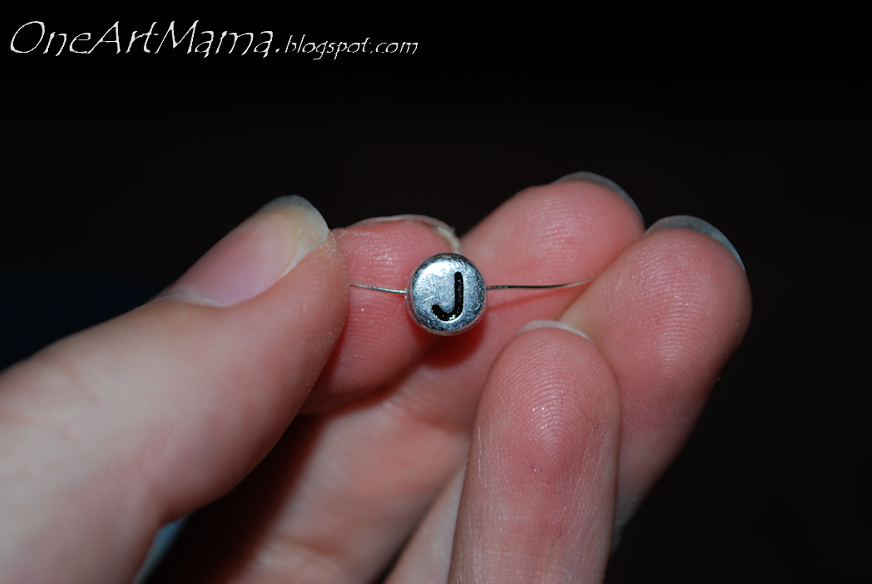
I also wanted to add an initial for personalization. I threaded 26 gauge wire through this “J” bead, twisted it, formed a loop, and wire wrapped it.
I put the crystals and the “J” on their own jump rings and attached those to the pendant.
Then, I added a chain, and TA-DA! My gift is ready.
This is really a pretty simple project, and you can make it personal in so many ways. You can use any definition you want, or you can substitute sheet music, a book page, a copy of a poem, a map, a photo…the possibilities are literally endless!

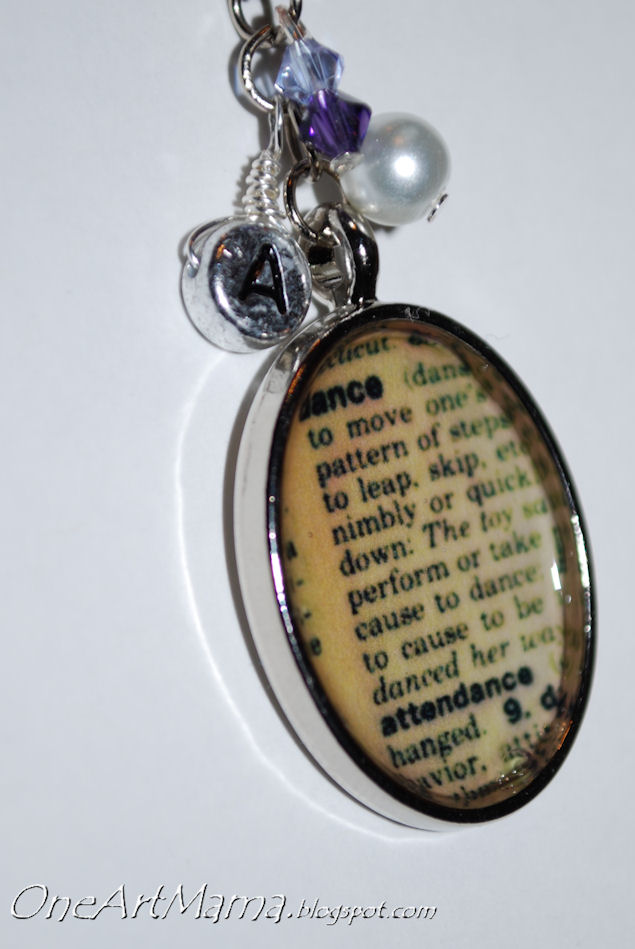
Here’s the one I made for myself using the definition of “dance” and my favorite color, purple!
I also used this technique to create the Hope Pendant, which was part of the un-giveaway I’ve been bugging you about for days.

What definition and colors would you use? If you make one, I’d love to see!

This is gorgeous! I just adore it! Thanks so much for sharing the tutorial!
What supplies do I need
This is fabulous! Great idea, great tutorial!!
You know what would be a GREAT twist on this? To do a snippet of a child’s name with what the name means — tie in a couple of birthstone beads and that would be a great present for a new mommy (or grandmommy)! Thanks for the terrific idea! 🙂
Really love this! might have to make some of these for Christmas!
Omagosh. I LOVE this! I really really wanna start making jewelry but I feel like I might not be able to…like I’d be a jewelry making FAIL. BUT, that dimensional magic looks so easy! I love Mod Podge. LOVE. I might have to try this. 🙂
Love! I wish I could make jewelry. I love your jewelry!
I must look for the mod podge dimensional magic the next time I’m out. This is such a neat idea and turns out so pretty each time you do it.
Very cool! I love the little embellishments you added to the already-awesome pendant! I seriously love this! Thank you so much for linking up to MYM!
Jamie
For Love of Cupcakes
I love this! Sooo Cute! The Dimensional Magic is still on my craft to-do list. This is great inspiration. Thanks for sharing it!
Yesterday, I bought lot of stone from web and made earing from your blog idea. My sister like and today is her first day of collage, and wear that with matching dress.
I love this idea! Saw your link over at homework and had to come check it out. Brilliant!
oh my gosh! I love that soo soo much! I can’t wait to make this!
I saw your pendant on COM Monday and adored it immediately!! I definitely want to make this soon!!
http://dianna-the-explorer.blogspot.com/
What a great tutorial! I think I may make some of these for Christmas gifts this year. Such a clever idea to take a picture of the dictionary page!
Nif @ http://www.call-me-nif.blogspot.com
I love this idea!
This is super cute!! I love the pendants – and the little embellishments of the beads is so cute too!!
Great ideas, Amy! I love the bling you added at the top of the pendant. So many different ways you could personalize this for friends and family! Thanks for sharing!
SUPER cute!!! i’m not sure what word i’d use- but it would be a great gift for my sister, she loves necklaces 🙂
I just love this and would love to feature it next week. Thanks so much for linking!!
I have an unopened bottle of dimensional magic in my craft room…looks like I need to start using it as these turned out amazing!
I’d love for you to link up to my very first Fresh Friday Link party!
http://www.releasemecreations.com/2011/10/fresh-fridays-link-party.html
What a great idea! I love the look of things made from dictionaries! Thanks for sharing this week!
Very neat! I love it!
Just stopping by to let you know I am featuring this today @TheGunnySack!
Hi Amy! Love the pendants and how you chose a word to highlight. Thanks for joining us as A Crafty Soiree, I’ve featured your project this week.
Amy — I found this tutorial over at Craft, Scrappy, Happy when you originally posted it and I added to my Pinterest board to try. Well, I tried it last night and posted on my blog, would love for you to check it out. Thanks!
http://herestohandyandy.blogspot.com/2011/11/pinterest-thursday-word-pendant.html
Really cute! Thank you for sharing at Feathered Nest Friday!
Love this! I haven’t see the dimensional Mod Podge, but would love to try it! Thanks for the tip. Your charms are awesome!
-Revi
That is very pretty!! Good gift for christmas too!!!
You are one awesome crafter!!!! keep posting!!
http://votreamielouie.blogspot.com/2011/11/my-heritage-friday.html
Hi Amy! Your idea inspired me to share your version in my Inspired Noel series on my blog today! Thanks for sharing your ideas!
I love this! I just pinned it and hope to get to it sometime in 2012! Thanks so much for the inspiration.
This comment has been removed by a blog administrator.
Thank you so much for this! I’ve been looking for how to do this, but I could only find links to Etsy. Where did you find the pendant? I’m very new at this!
I got the pendant at Hobby Lobby!