Tie Dye Your Summer
Thanks to I Love to Create for sponsoring today’s post and giveaway. All opinions are my own.
Nothing says “Americana Summer” to me quite like tie dye! But, I have to be honest…it had been a long time since this artsy mama gave it a go. In fact, the last time I played with tie dye was when I was a kiddo in 4-H and we made some colorful t-shirts. I avoided it because I was afraid it would be way too messy. Then, I found out there’s an easy, less-mess way to color our summer using I Love to Create’s Tulip One-Step Tie Dyes! Here’s how it works:

TIME REQUIRED: 20 minutes {plus drying time}
DIFFICULTY LEVEL: easy/beginner
SPECIAL TOOLS/SKILLS: Tulip One-Step Tie Dyes

For our first project, I decided to try making some fun Americana kitchen towels we could use this summer. Between the 4th of July, Veteran’s Day, Labor Day, and everything else in the middle, it’s a great time for some red, white, and blue. I thought these would make our kitchen more festive, plus, if they didn’t turn out well, it wasn’t something we had to wear; they’re just going to clean up messes anyway, right? A fool proof first attempt!
Materials:
– plain white towels {mine are the flour sack type and I found them in a 4-pack at Target}
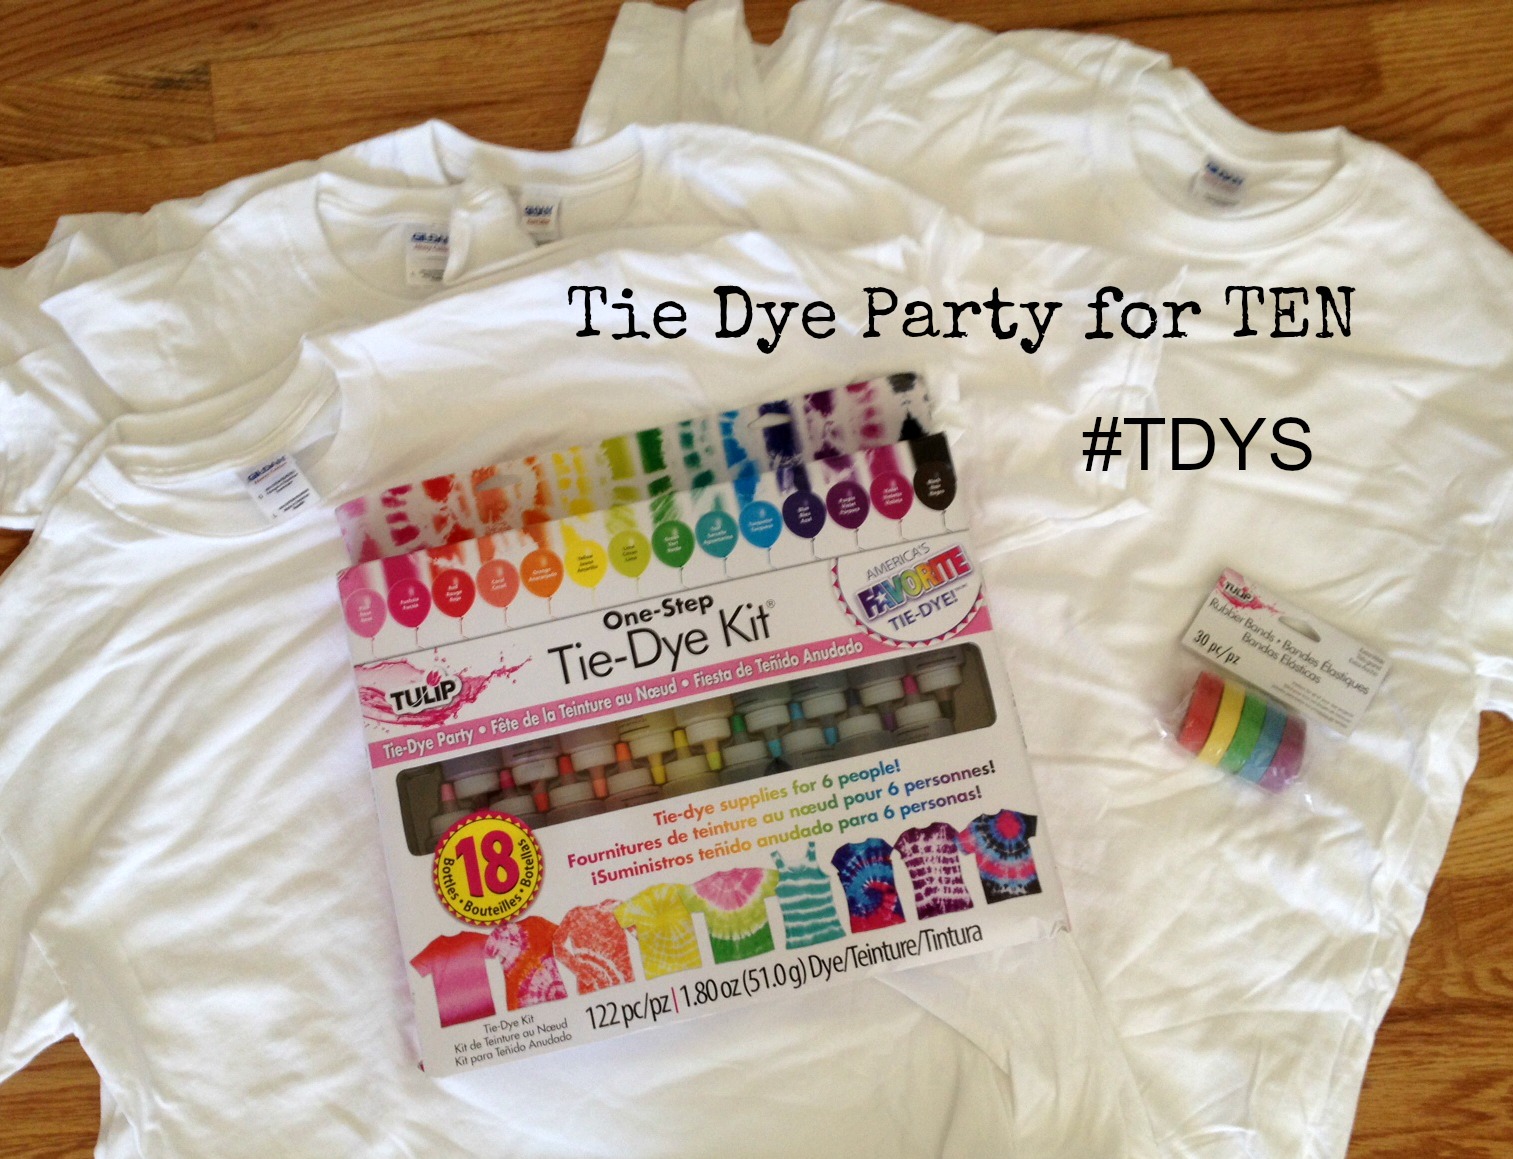
– I Love To Create’s Tulip One-Step Tie Dye Kit {includes bottles, dye, gloves, and rubber bands}
– surface covering, like a newspaper, paper bags, drop cloth, old sheet, or anything else to protect your work surface
– warm water
– plastic wrap

All you have to do to create your own masterpiece is choose the kind of design you want, roll/fold your towel for it, and secure with rubber bands. While wearing gloves, fill the dye bottle to the marked line with warm water and shake until all the powdered dye is dissolved. Then, squeeze the dye onto whatever area{s} you want each color to be. It’s that simple!
Since I had four towels, I decided to experiment with a few different designs. I’ll share them all with you so you can see how fun and unique each one turned out!

First, I tried the bullseye or concentric circles. To do this, you grab the napkin from the center and pull up.

Wrap a rubber band tightly around the napkin a few inches below the spot you pulled up. Place another rubber band a few inches below the first one and continue, spacing them out at whatever intervals you like.

I dyed the top section red, left the next one white, dyed the next one blue, and left the final one white. Then, I wrapped it up in plastic wrap for 6-8 hours.

Finally, I rinsed out the excess dye, removed the rubber bands, and this is what I got! Love it! A giant bulls-eye in Americana colors!

The second technique I tried was the Swirl. To do this one, you pinch in the center and start twisting in one direction until your entire napkin is rolled up.

Then, you secure it with rubber bands. Each banded section will look like a little slice of pie. 🙂 Mmm…pie. I used red dye on every other section and left the remaining ones white.

Here’s what I got after I wrapped it, let it sit, then rinsed it.

The fourth and final napkin I dyed used this technique too, but not quite as purposefully. I was running out of both colors of dye at that point, so I basically rolled it up, banded it, then Little Crafter rolled it around randomly in the drip piles left on my plastic from the other three napkins. Not nearly as purposeful as the others, but I think it still looks pretty darn cool, don’t you? It’s LC’s favorite of them all.

The last technique I tried was simple Stripes. For this, you fold the napkin accordian style, like so.

Place rubber bands wherever you want them to go to create the stripes. I spaced mine as evenly as I could to make five sections. You could also do a mixture of wide and narrow, or whatever you like. I dyed both ends blue, the center red, and left the other two sections white.

Here’s how that one looked after being wrapped and rinsed! I think this one might be my favorite.

What do you think? Which technique do YOU like best? It was actually surprisingly simple to do…so much so, that I have more plans. Plans that involve three t-shirts and Ravens colors. Oh, yes, friends. The Artsy Family is going to be ready for football season this year with some custom dyed tees. I. can’t. wait.

In the meantime, if you think this looks like fun {because clearly it IS}, I’ve got great news for you! I Love to Create is giving one lucky reader everything you need to Tie Dye YOUR Summer! The prize is a Tie Dye Party for 10, including a One-Step Tye Dye Kit, 10 Gildan Adult Large T-Shirts, and extra rubber bands.
Rafflecopter will walk you through the entry process; good luck!
a Rafflecopter giveaway
Want more fabulous Tie Dye inspiration? Take a look at these other projects from some of my bloggy friends…

They are all very nice, but I love the “Stripes” one the best! Good job on the tie-dying, looks like lots of fun!
Pat F.
Las Vegas
I like the stripes one the best. Thanks for the giveaway!
Your towels turned out great, love all the different techniques you tried.
Such a fun idea for tie dye!! 🙂
These are all super cute ideas! I love to tiedye!
I love these techniques – so awesome!
I just did a sharpie tie dye style 4th of July shirt, but I really like your tutorial on the different ways to do it and the results. Pinned and featured on my fb page.
Thanks so much for the pin and feature, Carrie!! Have a great weekend!
Oh my goodness! I LOVE all the different techniques you used to make these awesome towels!
I’ve wondered how to do stripes- thanks for the tips! We try tie dye every summer 🙂 And sometimes I ruin it… thanks heavens for a kit with better instructions 😛 All of your towels look great!
Oh these are so cute! What a fun idea!
What a fun summer project. We love to tie dye stuff!