My First DIY Furniture Redo!
Guys, I am SO excited today!!!
I mean SERIOUSLY excited!
I’m about to share with you an extra super-special first ever in the history of One Artsy Mama kind of project!
Presenting…my first furniture redo!
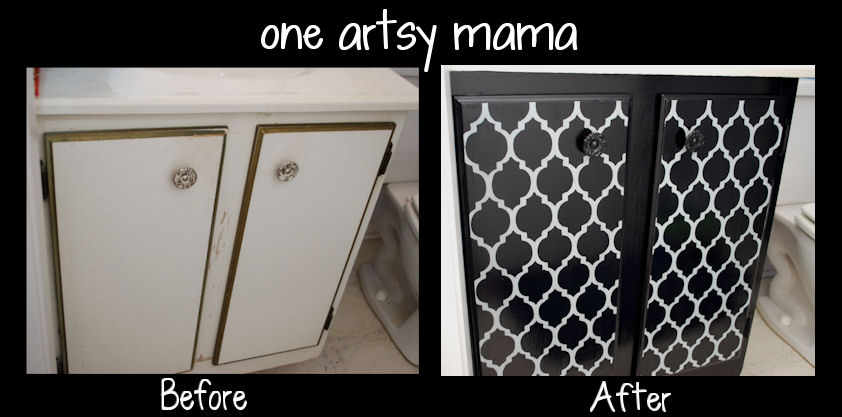
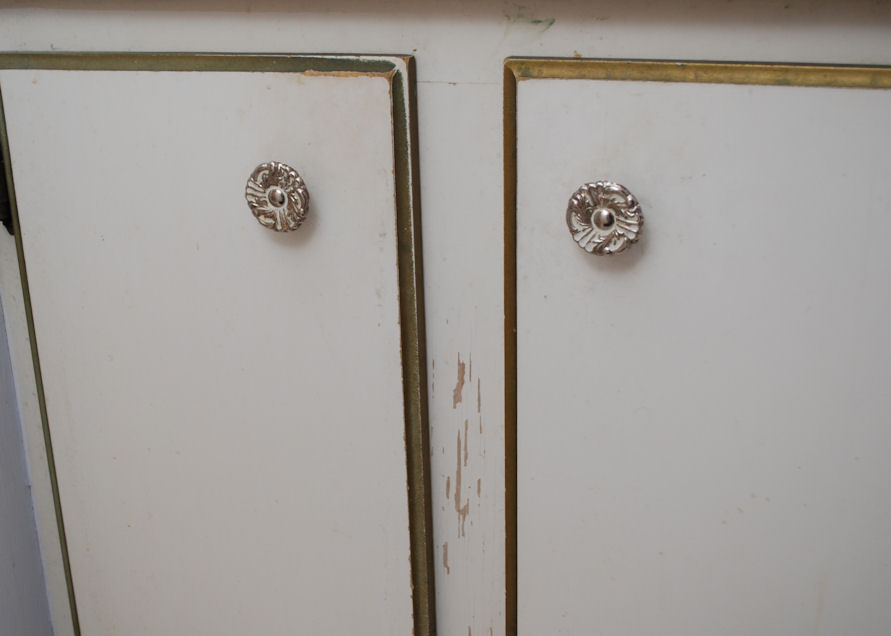
I have to admit, I was really intimidated when I first started blogging and seeing all the amazing furniture projects out there. My comfort zone is more along the lines of sewing machines, beads, and pom-poms, know what I mean? But this ugly old vanity in our master bathroom has bugged me for TEN YEARS now! Meet “Mr. Ugly.”

Really. 10 years. Every time I look at it I think “ew.” The ugly gold trim, the places where the paint is coming off {I know distressed-looking stuff can be shabby chic, but only when you do it on purpose!} Ugh. Mr. Ugly, you’re just an eyesore.
I hated it but I just didn’t know what to do about it, and on the list of priorities for home purchases, a new vanity {for the bathroom nobody uses but the three of us} just wasn’t near the top. Then, oh blessed then, Cutting Edge Stencils came into my life. They offered to send me my choice of stencil to review {after I begged them} and I picked the Cassablanca Craft Stencil, size small. I used it for three projects already, all canvases, and I finally decided to take the plunge and try it on Mr. Ugly. Here’s what I used:

– my trusty Cutting Edge Stencil
– stencil brush and assorted paintbrushes
– gray and black acrylic paint {one bottle of gray, two black}
– Miniwax Polycrylic semi-gloss sealer
Let me preface by saying this is a “do as I say, not as I do” kind of project. See, I’m pretty sure I’m one of the world’s most impatient crafters. When I get me an idea, I can’t rest until it’s done, or at least started. Sooo, I tend to not always take my time and preplan and all that good stuff. In all honesty, as I worked on this, I did a little of this, then a little of that, then back to this…but I don’t recommend working that way. I also recommend taking the doors off before you start. Just sayin’.
STEP 1: Paint entire cabinet with two coats of your base color. Again, a patient person would take the doors off, which would be much simpler.

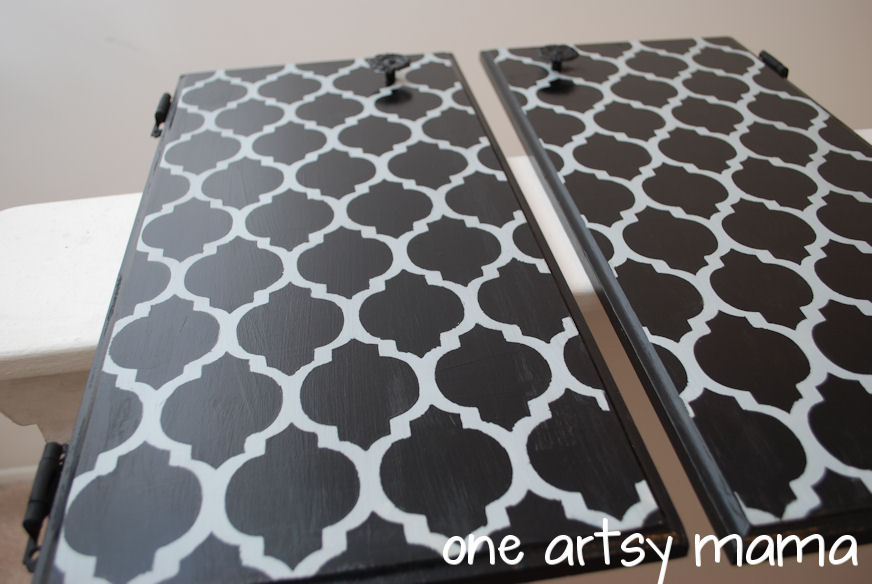
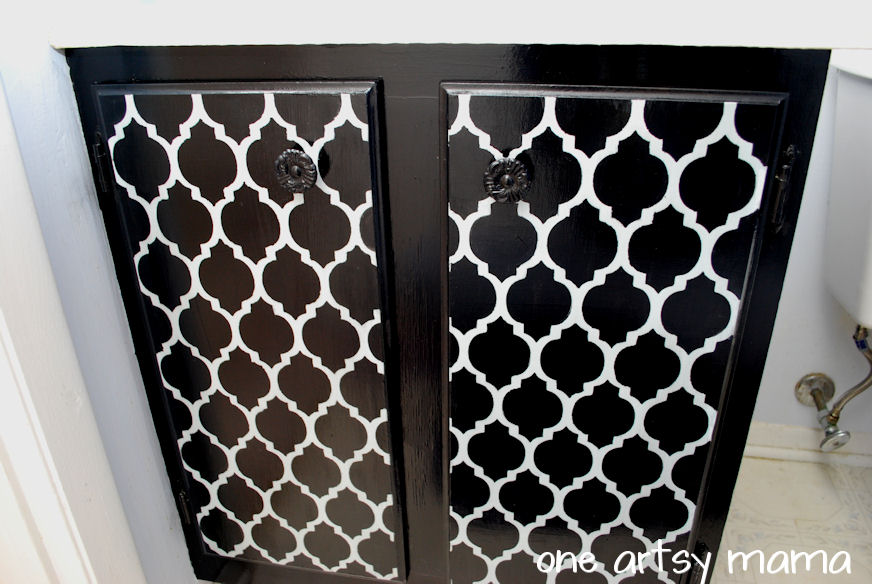
STEP 2: Stencil doors and side of cabinet with black. Paint front of cabinet with two coats of black as well.
I also painted the knobs and hinges black. I may get some new knobs…jury’s still out on that one. Thoughts?

Again, this would have been MUCH easier if the doors were off, but, eh…
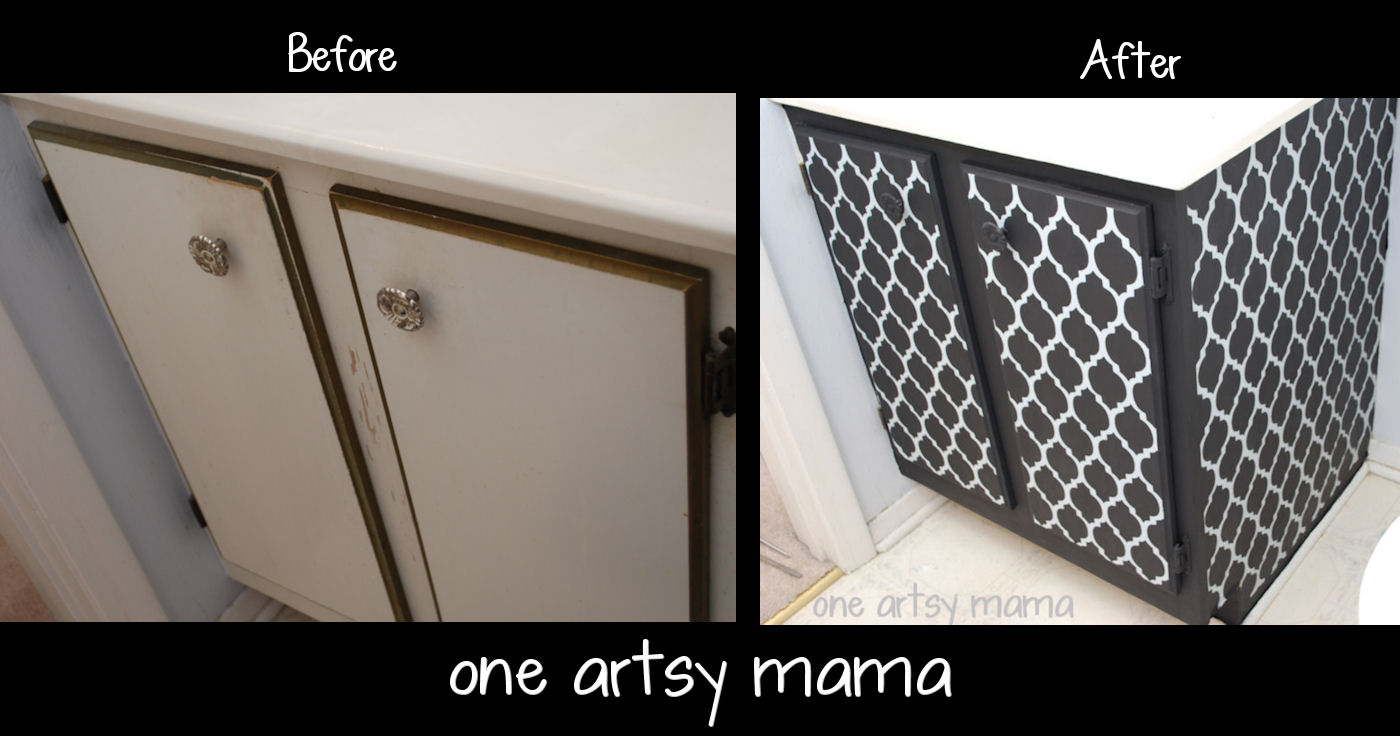
I have to confess at this point that stenciling the side of the cabinet was just plain hard. Why? Well, since I couldn’t move the vanity at all, I just had to work in the space the best I could. You should have seen me squeezed all in and around the toilet trying to get these perfect little stencil images. Oy. The ones at the very bottom, top, and back edge are a little um, shall we say “less than perfect”, but shhhhh! You can’t tell from a distance, right? Next time, I’m definitely stenciling something I can move! And I’m deep cleaning the toilet too. Pee-yuuu!

So far so good, right?
STEP 3: Apply sealant.
The last step was to seal my paint. Naturally, being in the bathroom, I know the vanity is going to get wet, whether it’s a splash from LC’s bubble bath, a drip from the faucet, or a little ‘aim accident’ when LC goes potty. So, I knew I needed a good way to make sure my paint job would stay in tact.
I was tempted to just Mod Podge it {that stuff can do just about anything!} and it probably would have worked, but I’m running low. So, I decided to go ahead and ask an expert. We went to Lowe’s, my favorite part of which was LC walking through the store yelling, “Ar, Ar, Ar, I’m in the man store!” They recommended exactly what I needed, Polycrylic semi-gloss, and after two coats, my vanity was pretty AND shiny.

I did finally get hubby to take the doors off at this point. Mainly because it was literally impossible to paint the very left side of the cabinet front otherwise.
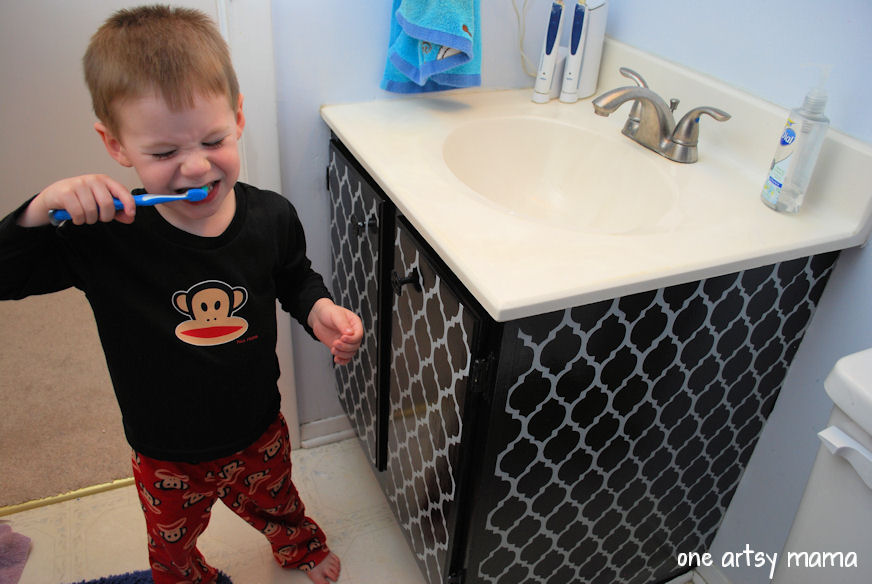
The final step was reassembly. Ahhh. I love a completed project, don’t you? Mr. Ugly no more! Needs a new name, don’t you think?

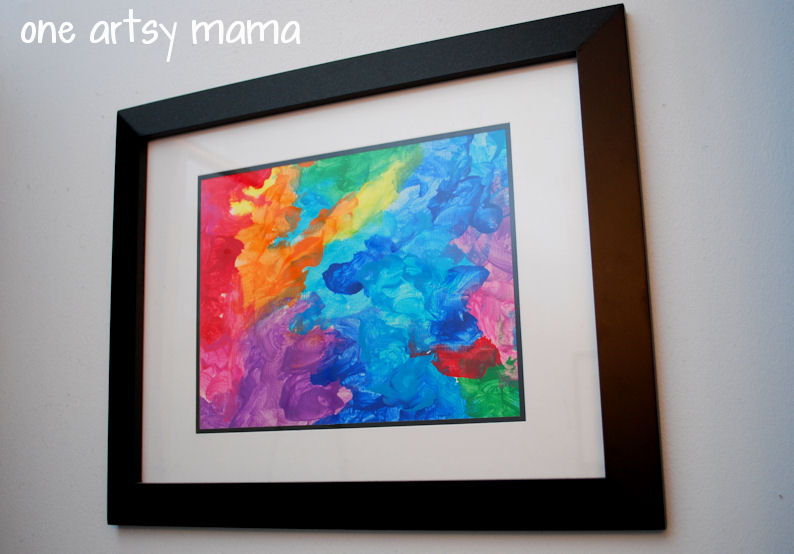
LC’s reaction was, “That looks neat, Mommy. You did a good job.” Which is important since previously he was the only artist with work on display in that bathroom.
Yes indeed, friends, we’re LC tested and approved!
Well, what do you think of my first furniture project?
I’d love to hear your thoughts {unless you hate it, in which case, nevermind}! I’m super excited about it…and now I’m just walking around the house with my stencil wondering what to attack decorate next!
Happy Stenciling!
I’m linking this up to the Pinspired and Rewired Challenge!

My original inspiration was a combination of the pictures in these two pins:
This one, which gave me the idea for the black Cassablanca look, and this one which made me think of stenciling my cabinet in the first place!


Amy,
This looks AWESOME!!! What a transformation! I’m pinning this one! Love the contrast of the white over black. Really, very well done!
Barbara @ Chase the Star
That looks great!!! Now you’re going to paint every piece in your home. Lol. It’s kind of like what they say about tattoos. Once you get one you want more. I love your new vanity!!! You did amazing for your first time. 🙂
This is freakin awesome Amy! What a transformation!! And your son’s artwork is beautiful. Two very enthusiastic thumbs up all the way around. I’d love for you to come share your post at my link party.
http://whitelightsonwednesday.blogspot.com/2012/04/wednesday-whatsits-4.html
That turned out so good, now that it is done i bet you wish you would have don it a long time ago. I love the stencil you picked
Wow! And I mean WOW! That looks AWESOME!! Great before and after! I’d love it if you linked this baby up at The Little Giggler. 🙂 Seriously awesome job!
http://www.thelittlegiggler.com/2012/04/love-it-and-link-it-up-4.html
This is gorgeous. I love furniture redo’s and you have done an absolutely brilliant job here. Great colours too!
Great job! nice furniture information for me. i love this blog.
office furniture fort worth
baby furniture fort worth
leather furniture fort worth
I just love it…what a difference it made…
that looks wonderful!!! what a transformation!! 🙂
Oh Amy, how could you cover up that beautiful vanity? With it’s chipped paint and gilded charm??
Just kidding — it looks AMAZING!!! I love that you’re taking that stencil out of the box (no pun intended!) and using it all over the place!!
You defiantly need to find a new name for him. Now way anyone would call him ugly now! Great job!
What a transformation! Great job. I am a little intimidated by larger-scale stencil projects, but you are making me want to dip my toe in the pool!
Blythe
I was amazed at the choice of paints – I always assumed one had to use wall paints – but you know what they say about assuming… This has inspired me to rethink painting things in the house. Great project and great blog post! Thank you for sharing!
Oh wow, this turned out great Amy!! I am a tad intimidated by furniture projects too, but I want to tackle a few summer!
Amy, that looks pretty darn amazing for your first furniture redo! I’m glad Little Crafter liked it too! 🙂
Beautiful! And kudos to you to get that close to being underneath a toilet…I don’t think I want to know what’s under mine…
Great Job! That is beautiful!
I’m not brave enough to do that lol!
Awesome!!! I think it looks great. I say yes to getting new knobs, like maybe something glass and sparkly to give it that extra pop.
Looks really great!
100% improvement! I am wondering if you would have needed to seal it if you had used wall or trim paint? Any idea?
LC was right! You really did a great job, and I hope you continue to these furniture DIY projects!
i love it!!!
So fun! The transformation is awesome. My favorite projects are upcycling & furniture redo’s. Amazing job lady!
That looks great. So much better than the ugly gold and white cabinet. I can’t believe you waited 10 years to tackle that thing. haha. Good job.
This comment has been removed by the author.
You’re a natural apparently! You kicked butt! The stenciling looks perfect. Way to go! (Pinning it 🙂 )
This looks fantastic! I’ve been thinking about trying to redo the furniture in my daughter’s room but have been too intimidated to start. After seeing this, I think I may have to try stenciling! When moving the stencil, do you have to wait for the paint to dry, or can you line it up while it’s still wet? Thanks for sharing this!
What a wonderfully witty stencil. I will say I find that project a bit intimidating, but your results are so striking
Wow! Talk about a transformation. Looks great!
This looks great for your first transformation! Wonderful job! I’m dying to get a cutting edge stencil myself!
That looks terriffic! Great job! I would love for you to share this (and any other creations) at Pin It and Win It Wednesday @ http://www.cheapcraftymama.com!
Are you kidding me? That is fabulous, it is hard to believe this is your first redo. Keep up the good work, Lori
Woohoo. You are a force to be reckoned with. This turned out so lovely. I love the stencil pattern that you chose and I looked closely and still couldn’t see any spots that were off. This is a whole new arena of expertise for you. So proud of you!
Great job! SUCH and improvement! 🙂
Looks great!!! So impressed!!! I hope you will share this at The CSI Project this week. The challenge is stencil projects. You can start linking up tonight. And just might win!!!
http://www.thecsiproject.com
Hugs,
Dee, the CSI Girl
Pretty pretty PRETTY! Love it! and I am so envious… you should see the cabinets in my bathroom.. we had them replaced 2 years ago… and until now, they are still on base paint. Aarrggh! One day soon (I hope) someone will get to paint them (i.e. hubby, haha)
This is GORGEOUS! I have been wanting to tackle a few furniture projects myself, but like you…have never done one! This is definetly inspiring me to just go ahead and try it! Love it! Great job!
Beautiful!! Thanks for linking to Things I’ve Done Thursday!
I love it, Amy! I have my own version of Mr. Ugly in my master bath; I may try something similar with it. Thank you for sharing this! It turned out great, and I love the munchkin’s matted & framed artwork! 🙂
So cute! I love the design. I would love for you to share this with my Unveil Your Genius link party! http://taylornorris.blogspot.com/2012/04/unveil-your-genius-link-party-6.html
(New linky every Thursday…each linky runs for a week)
Happy Sunday!
That looks so nice! I love it! Did you really get the stencil by begging? I keep wanting to try one of those stencils but have about 5 styles I want to try, start to order one then change my mind, pick another, change my mind and then never order one. All my places I want to use one need different sizes so I don’t know where to start. May just go with the one you used as it really looks great!
Your “new” vanity looks AMAZING!! Great work! I pinned you to save this idea for later.
Heidi@HomemadeBeautiesByHeidi
Thanks so much for partying with us this week Amy.:)
I love what you did to your bathroom vanity! I never thought to stencil & repaint over mine.
Thank you for linking up last week to Sew Woodsy. Just wanted to let you know that I featured this today!
Did u use the spray for the back of the stencil?
So it sticks how did u get it to not (bleed )
I have tried it without the spray but have never gotten clean lines
Oh my goodness, what a huge difference! Awesome job! I’m a new follower, would love for you to follow me back.
Hi!
So fun! The transformation is awesome. I enjoy your post. very interesting photos and labels. I really impress from your work on this blog. Keep share your work and also share with us. thanks.
baby furniture fort worth
office furniture fort worth
leather furniture fort worth
The first diy fr furniture is given in the post here. Useful information
BabyCots
Nice job on Mr. Ugly! He looks great now. How about Miss Pretty for a new name?
Ha, yes! I like that!