NKOTB: Jeannie
Are you ready to meet today’s featured “New Kid on the Blog”? Let’s give a warm One Artsy Mama welcome to Jeannie…here she is:

I am a recently retired school secretary who pulled out “the bucket list” to plan the rest of my life! Besides being a habitual planner, I love learning new things and even more than that – I love sharing what I’ve learned with others. I believe that may be the force behind me becoming a blogger, besides-it was on my bucket list! I’d love for you to stop by “for what it’s worth-jeannie ” to see what is there and share your thoughts. A huge thank you to Amy at One Artsy Mama for featuring me as a guest blogger. She has a fabulous site you will find fun and interesting to visit.
When my son announced he was getting married in a log cabin church in Granbury, Texas and wanted a rustic Tex-Mex wedding rehearsal dinner I was excited. We found a restaurant off the square with a nice outdoor porch and wrought iron tables and chairs.
I had in mind to create easy topiary center pieces and natural looking photo stands that included candid photos of the couple and advice for a successful life together. I searched craft stores for prints and the Half Price Book Stores for books with quotes, sayings and advice appropriate for a newly wed couple. After collecting a nice stash I typed some of the quotes on my computer using a fun font and decorative borders. I spaced them so I would have a finished rectangle that would fit nicely inside the cards.
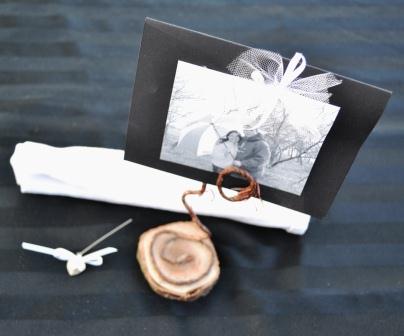
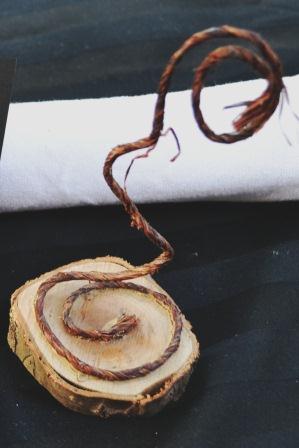
I began making photo stands for each place setting with help from Hubs. He cut a couple of branches with about a 3″ diameter from an apricot tree my son planted in our back yard when he was about three years old. Hubs then made 1/2″-3/4″ thick disks from the limbs. The wood has a very pleasant sweet smell but really, any wood will work for this project. This would not be hard to do yourself if you don’t have a handy dandy DIY hubby to help. All you need is a small bow saw to cut them by hand. Hubs used his table saw because it was already set up and fast to do.
Now, take some brown wrapped wire that resembles grapevine that can be purchased at a craft store and use wire cutters to make 12″ strips. Use some needle nose pliers to make a coil shape about the size of the wood disk on one end. Bend the large coil 90 degrees from the rest of the wire “branch” to form the base. Make a double coil that is a bit tight on the other end that will hold the card. Loosely bend the wire in a casual wavy shape between the two coils. Use a strong glue like Gorilla Glue or liquid nails to attach the wire to the wood disk. Let the glue dry thoroughly (over night will do).
While the photo holders dry, pull out a lot of photos you’ve collected of the happy couple and create place cards. The place cards for this project are on 8.5″ x 5.5″ textured black card stock (which is exactly half of a full sheet of card stock), so the photos should be cropped to fit (about 3.5″ high x 4″ wide.) Top fold the card stock paper in half and glue a photo on the front. Embellish the photo with a tuft of tulle tied with ribbon and maybe even some small silver charms from the craft store; attach to the card front with a corsage pin. Great, the outside of the place cards look fantastic and you’ll be feeling quite proud of yourself…like I do!

Open the card and glue one of the paper quotes you made earlier in the center. All that is left to do is create a unique card for each guest, slide them in the photo stands and place them on the table. Sometime during the program you can ask the guests to read the advice to the couple. Go an extra step by printing an extra set of photos and quotes to make a small photo album for the couple.

Here’s what you need to make these Natural Photo Stands:
- wire cutters
- needle nose pliers
- Wood disks about 3-4″ diameter
- Decorative wire
- Exacto knife or scissors
- 8.5 x 11 Card stock or heavy craft papers
- Photo’s
- Quotes
- tulle
- ribbon
- charms
- corsage pins
- glue (stick glue and Gorilla glue)

What a beautiful idea!!
How cute those are! And with the added sentiment of the base coming from a tree your son planted, they are simply adorable.