Pumpkin Projects from #MyFavoriteBloggers
Hey, friends! I don’t know about you, but I loooooove fall! The weather here in Artsy Land has cooled off considerably, so I’m more than ready to start thinking about some of my favorite seasonal things…like PUMPKINS! Today, I’ve got a super-fun and festive pumpkin project for you and so do fourteen of my favorite bloggy buddies! Take a look…

Each month, this group of #myfavoritebloggers chooses a theme {remember last month’s apple posts?} and we all post our projects on the same day. At the bottom of my post, you’ll find thumbnail links to each of these fabulous pumpkin crafts, activities, and recipes! Sound like fun? Before I share my project, I’d like you to meet the beautiful and talented bloggers who are joining in the fun today:

Kirsten from One Tough Mother, Adrianne from Happy Hour Projects, Marilyn from 4 You With Love, Sky from Capital B, Tara from Suburble, Bethany from Pitter and Glink, Melanie from It Happens in a Blink, Lauren from The Thinking Closet, Kara from Petals and Picots, Carlee fromLadybird Ln, ChiWei from 1 Dog Woof, Kadie from 7 Alive, Amy from One Artsy Mama, Sarah from Repeat Crafter Me and Nancy from Small Things with Love.
Trust me. If you don’t already know them and read their blogs, you are going to love these girls!
Now. On to the pumpkin!
Jack-O-Lantern Pot

We actually made this particular project a few years ago with some really good friends of ours! They love making crafts too, so we had a festive pumpkin-making playdate! I posted about it then, but that was when I had about six followers and two of them were my hubby and my mom, so I thought it was worth sharing again with the larger community! Here’s how we made it:
Materials:
– terracotta pot
– black and orange acrylic paint
– paintbrushes
– Mod Podge or other sealer

Step 1: Paint entire pot orange and let it dry completely! {I think waiting for it to dry so you can add the face is the hardest part!
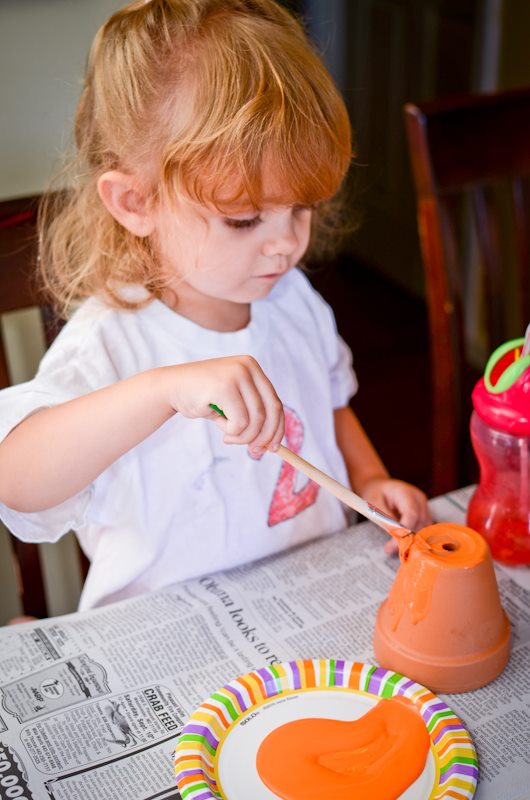
Step 2: Paint a face any way you like using black paint!

Step 3: Seal with Mod Podge or other sealer. Let it dry completely!

Step 4: Fill with candy and enjoy!
This is such a simple project to do and incredibly inexpensive! The pots cost 89 cents a piece, and we already had the paints and brushes on hand. Each year, Little Crafter looks forward to getting his out and filling it with his favorite Halloween candy…usually lollipops!
What are your favorite pumpkin projects? Take a look at these for more fall inspiration!
[inlinkz_linkup id=319114]

So cute! I love seeing all the kids creating their pumpkin masterpieces!
This is so freaking cute. I love how your children are helping and making their own crafts. I might seriously make a trip to AC Moore.
Thanks so much! You can’t beat quick, cheap, and easy!
Adorable and a fun project to do with the kids:@)
I love that this is a kid-friendly craft. We will most definitely be trying our hands at this. I can imagine how much fun my girls will have “designing” Jack’s face!
Amy I love flower pot projects and this is such a great one for the kids! 🙂
Gotta love me an inexpensive and easy craft…not to mention festive! Looks like those little ones had fun with this one, as did One Artsy Mama! Yay!
What a cute kids craft! And it holds candy – well, that’s an easy win 🙂
HOW CUTE ARE THOSE PUMPKINS!
you can even add glitter to make those even more cute
Oooooh! Glitter! What a great idea!
These are all great ideas, I love the pumpkin flower pot as well. 😉