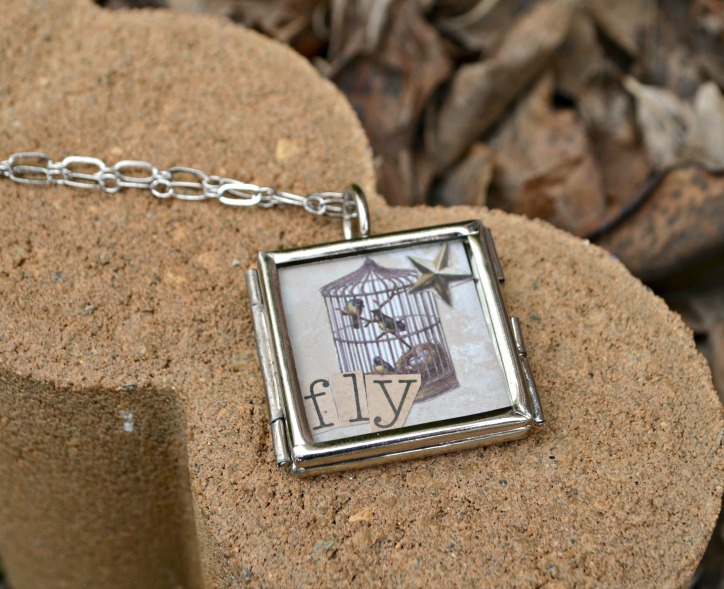
“FLY” Glass Locket
In case you haven’t figured it out by now, I love making jewelry. Whether it’s beading, metal stamping, clay, or something entirely different, I love finding new techniques and tools I can use to create one of a kind accessories. Today, I want to show you a necklace I had a lot of fun making using a glass locket from Goody Beads.
GLASS LOCKET
 TIME REQUIRED: 20 minutes
DIFFICULTY LEVEL: very, very easy
SPECIAL SKILLS/TOOLS: none
Materials:
{My materials were provided by sponsors like Goody Beads, Plaid Crafts, and Elmer’s. All opinions are entirely my own.}
– Square Glass Locket
– Silver Chain
– Podgeable Papers: Antique Urban
– Scissors
– Elmer’s Board Mate Extra Strength Glue Stick

A quick note about the design: I feel like this past year for me has been one of pushing the envelope and doing things I never imagined myself doing {like flying across the country by myself, approaching companies about design collaborations, and other things that required courage and persistance}. I felt like the idea of letting go, flying, and reaching for the stars was uniquely appropriate for me that this point in my life and my career, which is why this design is right for me. You may have something different in mind…that’s the beauty of this project! You can use any scrapbook papers you can get your hands on, you can cut things from magazines, or photos work too! By choosing patterns, colors, pictures, and words that mean something to you {or to the person you’re making it for}, it becomes a very personal work of art!
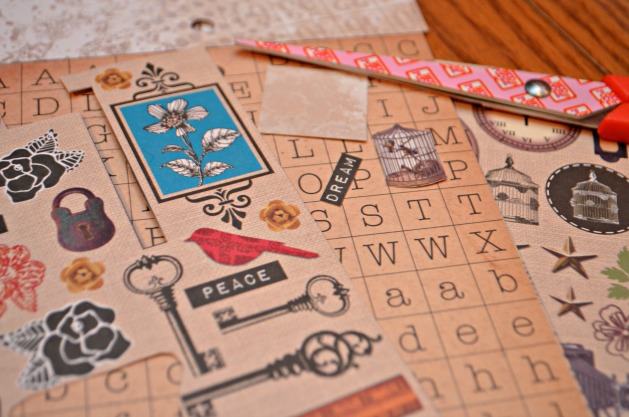
Step 1: Choose and cut your papers.
I cut a square from a tan background, then carefully cut out around a bird cage, a star, and the letters “f,” “l,” and “y.”
Step 2: Position the pieces and glue them in place on your background square.

Step 3: Place your square in the locket. It’s really up to you whether you want to secure it permanently or not. If so, you can use Mod Podge or Elmer’s glue to attach it to the back of the locket. If you want to be able to switch it out, which I personally think is way more fun, just sit it in there and close up the locket! There’s a little latch on the side to secure it and ensure that your design won’t fall out.

Step 4: Place the locket on a chain! The locket conveniently has a nice large loop on the top, so it should work with pretty much any chain you have. If necessary, you can buy chain and add a jump ring and clasp, but I bet you probably already have a chain at home that would work just fine.


It’s really that easy; the only thing you have to be able to do is cut and paste. Literally. Little Crafter can even cut things out and glue them down, so you have no excuses… Hmmmmm. That just gave me an idea. A wonderful artsy-mama kind of idea. Why not put kiddo artwork inside a locket like this one?! If you’ll excuse me, I have a little artist to track down…


Love it! The idea about putting kid’s artwork in it is perfect. Every mom would love to wear a piece of their child’s artwork not to mention how exciting it will be for the child. Thanks for the tutorial!!
I agree Crystal! Love this! 🙂
What a precious pendant 🙂 I really love the idea behind your locket design, I should put some thoughts in what I want to project through this locket too 🙂 Thank you for sharing this wonderful idea
Thank you so much! I would love to see what you come up with, as creative as you are!!
So pretty! I love how it turned out!