Stamped Textured Keychain
Friends, I’ve got a very special project to share with you today! Of all the kinds of crafting I do, one of my absolute favorites is metal stamping. I love how easy it is to personalize a project, and how many different things you can do to create a totally unique look. Today, I want to share with you something I made using a new “toy,” a texture hammer from ImpressArt. This is a gift for my friend and mentor, Sarah. I’ve already made her stamped jewelry, so I thought this time around, I’d create a keychain so that she can carry it with her all the time.

TIME REQUIRED: 20-25 minutes
DIFFICULTY LEVEL: intermediate
SPECIAL SKILLS: basic metal stamping
SPECIAL TOOLS: stamping tools, see materials list
Before I list out all the supplies, I used, I just want to note that once you purchase most of these things {the block, the hammers, the stamps, the punch, etc}, you’ll always have them on hand to use and re-use every time you want to create a stamped project. They really do pay for themselves in no time when you start using them to make all kinds of personalized gifts!
Materials:
Note: Many of my materials have been provided by ImpressArt. All opinions are honestly my own.
– Steel Stamping Block
– Metal Stamping Hammer
– Texture Hammer: Narrow Stripes
– Stamping Blank: Alkeme Circle 1 1/4″
– Letter Stamp
– Large 2-Hole Punch
– Stamp Straight Tape
– black permanent marker
– jewelry polishing cloth, or cotton swab and rubbing alcohol
– jump ring, large
– key ring
– needle nose pliers
– small bead
– head pin
Step 1: Place your blank in the hole punch and make a hole in the top.
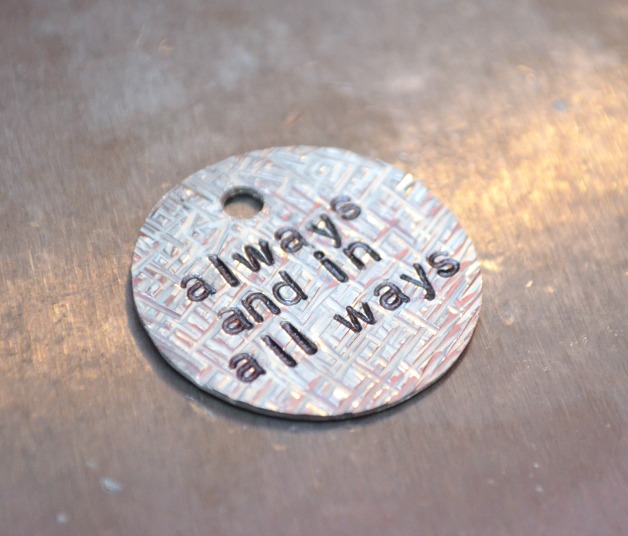
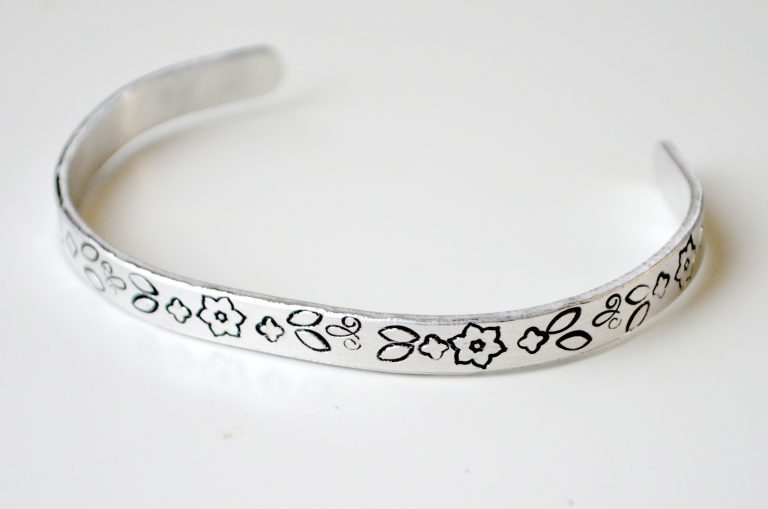
Step 2: Tape your blank to the stamping block and create texture using the special hammer. I did a cross-hatch pattern, stamping vertically first until the blank was covered in vertical lines, then turning the hammer and stamping the whole thing horizontally.

Step 2: Stamp your words. I chose to use the saying “always and in all ways” because it’s something Sarah and I often say to one another when we close out our emails, texts, and phone conversations. To make sure your letters are straight, use the tape not just to hold your blank in place, but as a guide for your words. Count the letters and spaces to figure out where the center will be and mark the letters on your tape before stamping them to ensure that they’ll look right. For more tips and details about basic metal stamping, check out my beginner stamping tutorial, which will walk you through with step by step photos and directions.
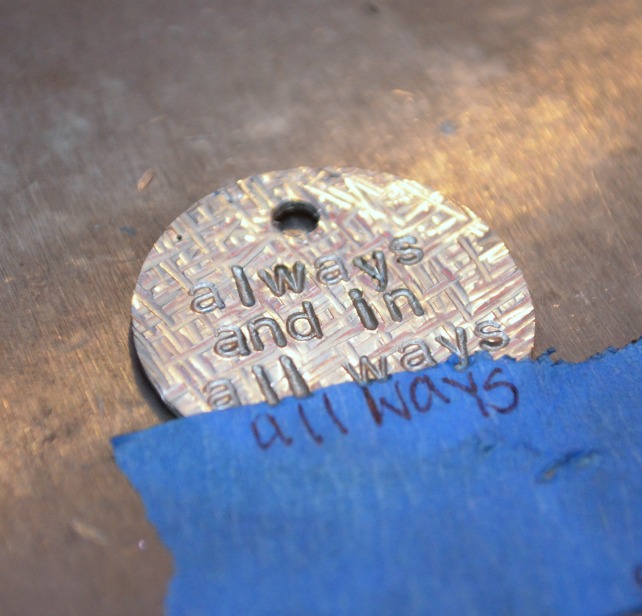
Step 3: Use an extra-fine tip permanent marker to color in the grooves of the letters so they stand out and are easy to read. I like to use Bic Mark-It markers because they’re acid free and non toxic. Once the letters are colored in, rub off any excess marker with a jewelry polishing cloth or cotton dipped in rubbing alcohol.
Step 4: Add a bead, a jump ring, and a key ring! Never done any beading? No worries, check out my Beading 101 tutorial to see how simple it is to place the bead on a head pin and create a simple wire loop. The bead I used was provided by my friends at Goody Beads; it’s the 8mm Fuchsia Miracle Bead, and boy is it pretty! All you have to do to finish up is place a jump ring through the hole in your blank, add your bead, close the jump ring, and attach it to a key ring.

Ta-da! I’m all about that new texture hammer! Doesn’t it add such a fun and chic touch? So much more interesting than a plain, non-textured blank!
While I made this gift for my friend, it could easily be adapted as a Mother’s Day or even a Father’s Day gift, don’t you think? {Maybe minus the bead for the men…} You could personalize it with a favorite saying, family names, or anything at all!

Who in your life would love a personalized keychain?


Love it! The saying is awesome! Love that you added the hot pink bead. Super cute!!
Love this! I can not wait to start trying out metal stamping! So fun!! 🙂
This is beautiful! I love the saying too 🙂
The texture to this is lovely.
I love this, and I love love love the saying! Do you mind if I use it in a future craft/card?
I love this saying…and I love that hammer!