
So Distressed…A Furniture Redo
This is a story that starts out well, turns ugly, and then turns into something beautiful. The other day, as I was getting ready in the morning, I was admiring my stenciled vanity and wishing I had another furniture project to attempt. I started thinking about the various pieces of furniture around the house and had an A-HA! moment. Hubby’s night stand.
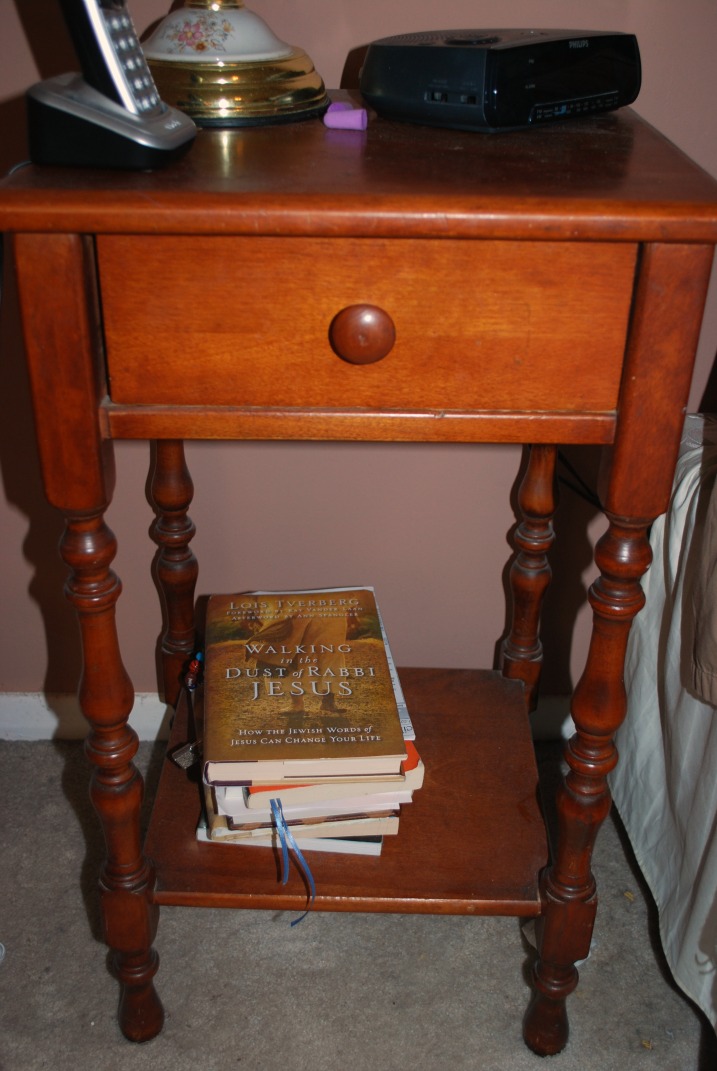
There was nothing “wrong” with it {well, except for a dusty bottom shelf…ahem}, but it didn’t particularly match anything in our room. Plus, I keep trying to add more color in there…the walls are brown, the comforter is white, and our furniture is all wood. A while ago, I decided to add some turquoise, so I made a pillow, and I also made some fun valances and a monogram canvas that helped bring some color in. I thought this would be the perfect project; I could paint and stencil it and give it a whole new look! Here’s the e-conversation hubby and I had on Thursday morning.
Me: “What would you think about me painting/stenciling your night table? {No is okay}.”
Him: “Sure. Go for it, I trust you.”
Did I mention I love that man?!
So, off I went to Michaels and got me some spray paint and acrylic paint. Two days and a whole lot of issues later, I ended up with this:

Here’s how I did it…and all my fails along the way!
NIGHT TABLE REDO
Materials: white spray paint, white and turqouise acrylic paint, sponge brushes, sealer, sandpaper, drawer knob, Cutting Edge craft stencil
STEP 1: First, I painted the entire table and drawer white.
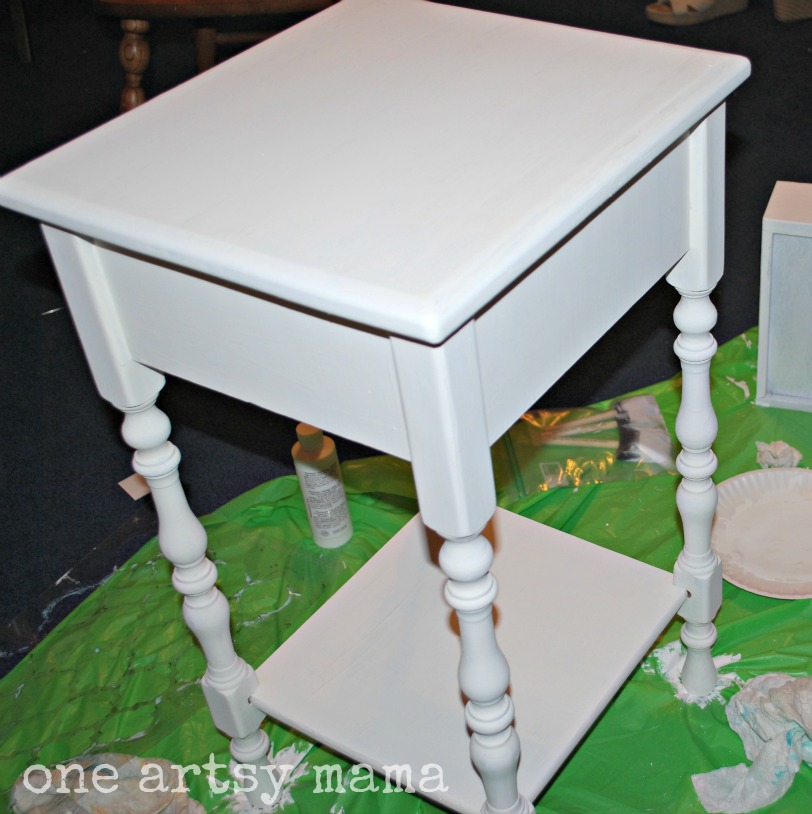
FAIL #1: I’m a terrible spray painter.
I started on the drawer and ended up giving it up because I’m just that bad at it. I think I’m either too close or too far away or too impatient. I keep getting funny bubbles and uneven coating and at this point I thought I was going to have to sand it all off and start over. Fortunately, only the front is really visible when the table is together…
Meanwhile, if you’re a DIY blogger, please don’t ever write in a post, “Oh, then I just spray painted it…” like it’s nothing. You make the rest of us feel inferior. 🙂
Solution #1: I decided to use acrylic paint and a brush instead.
FAIL #2: I ran out of paint.
Since I was planning on spray painting it, all I had was a small, not-full bottle of white paint. It quickly ran out, especially since my table required about 82 coats of paint to fully cover some spots.
Solution #2: Mom to the rescue.
She went to Walmart for me and picked up two huge bottles while I put Little Crafter down for his nap. Then, when she got back, she helped me apply the 82 coats of white paint. Isn’t she a saint?
Whew. Once that part was FINALLY finished, I moved on.
***********************************************************************
STEP 2: Paint shelf turqouise.

FAIL #3: My turqouise paint was too dark.
I took a piece of fabric with me to the store so I could match the shade of the curtains I made, but the only one I could find was much darker than what I wanted.
SOLUTION #3: Mix it with white.
I squeezed the whole darn bottle into an old empty vegetable can and mixed it with white until I got the color I wanted.
FAIL #4: My stencil wouldn’t fit.
Originally, I wanted to stencil the shelf as well as the top of the table, but the stencil didn’t want to go in there and no way was I cutting it. It would have been doable, I guess, if I fought with it enough, but I wasn’t in a fighting mood anymore.
SOLUTION #4: I gave up and painted it solid turquoise.
**************************************************************
STEP 3: Stencil the top of the table.

This part actually went fine, thank goodness. Hooray for Cutting Edge Stencils!
**********************************************************************
STEP 4: Apply Sealer.
FAIL #5: The sealer made ugly drips and turned my white table brownish in some spots. {can you see it in the pic?}
SOLUTION #5: Touch up ugly spots with white paint, then use a different spray sealer instead.
**************************************************************************
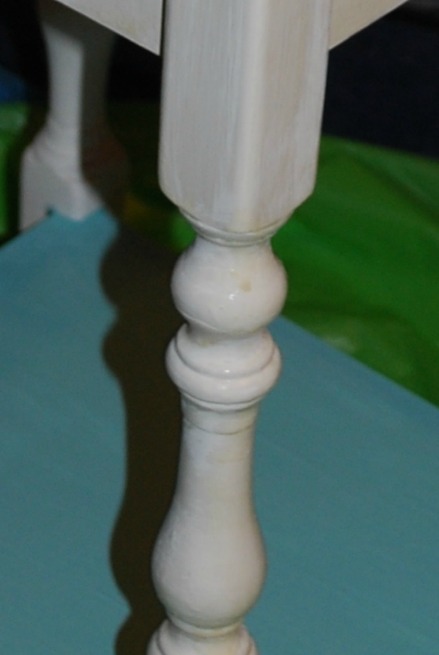
STEP 5: Distress.
Can I just say this totally freaked me out?

I’ve never distressed a piece of furniture before, nor did I intend to distress this one. BUT…
FAIL #6: My paint STILL wasn’t fully covering in a few spots.
SOLUTION #6: Distress it and make it look like you meant to do that.
It’s genius, really. So, I pulled out the sandpaper with no idea what I was doing. Fortunately, the table did the work for me. Seriously. I just started going along edges and the carvings, and poof. Like it was meant to be.

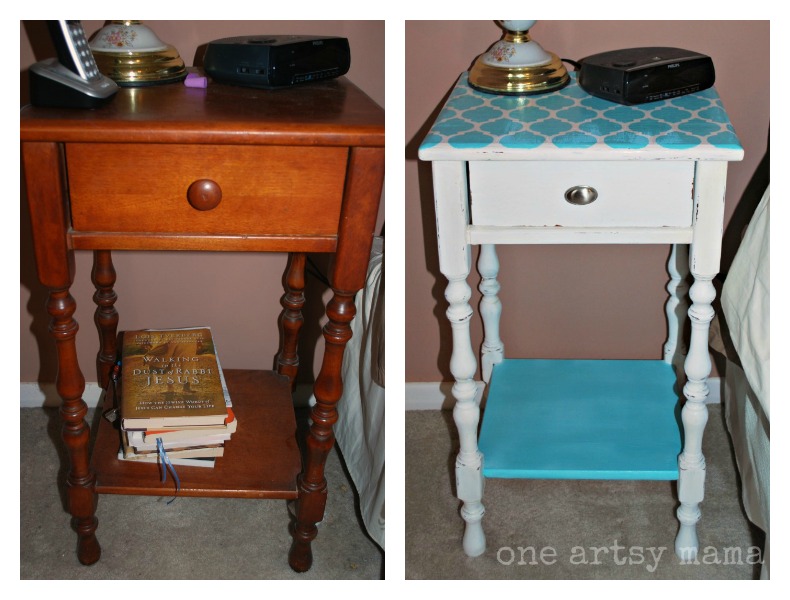
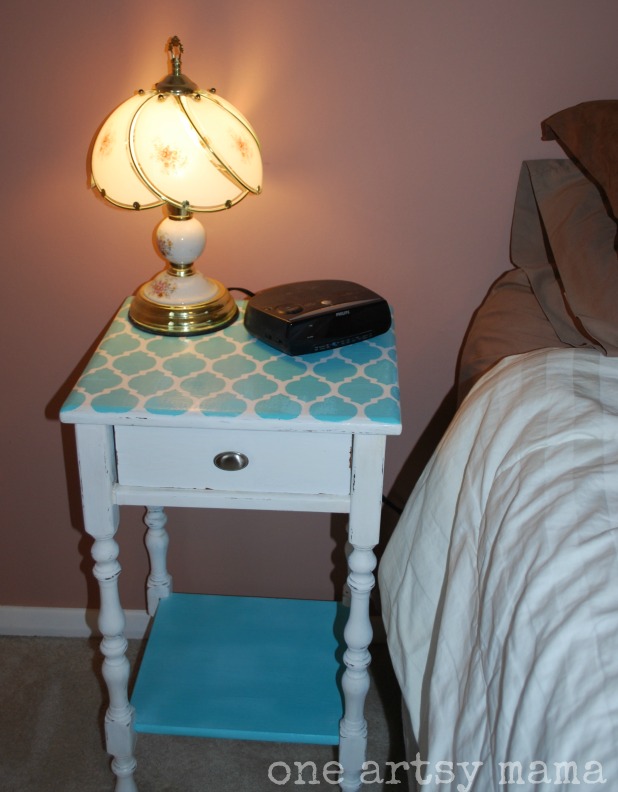
And so, here it is! The project I wasn’t sure would be a success turned out to be something I really love.

What a difference, eh? You’ll notice one tiny adjustment…hubby turned the knob horizontally and we both decided we like that better, although I think it works either way.
Now it’s brightening things up in its new home. Although, I confess, not five seconds after I saw it all together, I said, “hmmm…now we need a new lamp.” Hubby just looked at me.
Then he said, “This is a nice lamp.” Boys.
Happy Crafting!


Way to go, so cute!!
I just love it…I think the shelf looks great solid…
Turned out really cute…great job. 🙂
I’ve been wanting to see what happened to the night stand after you shared your conversation with your hubby on facebook. What a good sport! He has a good reason to trust you though; it turned out great!
GORGEOUS! 🙂
Amy I love how this turned out!!!! Sorry you had so many roadblocks, but it looks great!
Beautiful! 🙂
This turned out nice…I am now following you linky.
Love how it turned out. It looks great.
Holly
Awesome! But you’re not helping me w my fear of painting furniture :).
It looks so great! I love the distressing best of all! 🙂 And you are right- a new lamp would be perfect! 🙂
Love it! Came out awesome!
Love it!!
I love what you did with this table! The colors are calm and relaxing and the pattern is a nice added touch.
I’d love for you to share this on my new link party, Cooking and Crafts. http://www.jamscorner.com/2012/07/document.html
Have a great evening!
Julie
http://www.jamscorner.com
LOL – oh Amy. That’s how all of my projects seem to go and I am totally with you on the spray paint scene. I can’t do it either and I’m sure that it’s impatience. Or technique. I don’t know, but I agree. 🙂
Oh what a lot of work and frustration. At least it turned out super cute! I’m not a fan of spray paint either. I made the mistake of my first spray paint project being a set of bunkbeds- huge undertaking and sadly didn’t turn out real well. Oh well, live and learn.
Love this. It is so pretty. I have a Blog Hop on Wednesdays, and I would love it if you would link this post tomorrow. You can find it at
http://www.adornedfromabove.com
It is called Wednesdays Adorned From Above Blog Hop.
I hope to see you there. Have a great Day.
Debi Bolocofsky
Adorned From Above
http://www.adornedfromabove.com
Absolutely ADORABLE…I love the colors!! Hope you can link this up at my trendy tuesday party!! http://www.sweetlittlegals.com
Great make-over! I especially love the stencil on top 🙂
Thanks so much for sharing this at the All Star Block Party! It really is a great table. And I loved the color!
Holly
this turned out great! I hope you’ll stop by and add this and any other posts you’re proud of to my Wednesday What We Wore, Read, and Made Link party
marissa
http://raegunwear.blogspot.com
marvy,looks great and I love turq…makes me happy…So to make yu feel better I JUST FINISHED I think a piece ….4rth time…not 3rd but 4rth…too much…not the right mix tooo much black ….I finally did less is more and hope it sells…so I get the do over kalamities….again looks good and happy 4rth
Amy, this beauty is linked at:
Wow Me Wednesday
All Star Block Party
Linking Up with Lil’ Luna
We Did It Wednesday
Crafty Sasse
Look What I Made
Have a happy 4th, hope you are reunited with your computer soon, and great work on the table!! 😉
I love how this turned out! I also like how you shared your fails along the way. I’ve decided that not all spray paint is created equal. I’m not the best spray painter either, but the 2x Rustoleum brand is easier for me to use. It just seems to cover better and dry faster. I’d love for you to share this at my link party.
http://adventuresofadiymom.blogspot.com/2012/07/terrific-tuesdays-22.html
Rachel
This is a nice lamp :)))) Hahaha! Don’t listen to him, you need a painted lamp for that absolutely gorgeous nightstand. I love the turquoise and the stencil!
AHHH! Love this! Love those stencils! Thanks for linking up to “Strut Your Stuff Saturday!” Hopefully we’ll see you tomorrow at 8pm MDT for this week’s party! 🙂 -The Sisters
I love the way your table turned out. I remember the first time I distressed, and it freaked me out too. I was afraid I was going to ruin it and have to start all over again. As for the lamp…spray paint works wonders these days, though I wouldn’t know what to do with the glass part. Does it come off where you could buy a new traditional shade to go with it?
You are too dang cute. All your “fails”… I think I have been there for almost all of them. But my favorite was the heart pounding moment you are about to take sandpaper to something that’s taken WAAAAAY too long already. I hear you!
Well, in the end, you won because that table is adorable!!!
Visiting via Craft-O-Maniac.
Great job!
Anne
Super cute redo!! I love the color and pattern 🙂
Lina
Yes, the difference in the before and after is huge, and all in positive way. I like it very much it came out pretty well.
Your table turned out adorable!! I just stenciled a table and had a little more trouble along the way. It turned out great in the end, though! http://bluestarantiques.blogspot.com/2012/06/stenciled-table-and-what-not-to-do.html
cyndi
Came over here from the Cutting Edge stencils feature on Facebook–absolutely love what you’ve done!