Anthro Knockoff Earrings

Hey, friends! If you’re anything like me, then you are probably constantly looking for inspiration anywhere and everywhere you can find it. Especially when it comes to jewelry making, I often see something I like in a store, then try to figure out how I can make something similar myself…and for a fraction of the price. The other day, I was browsing the Anthropologie website and came across these Pave Spliced Posts that I thought were simple and pretty {and at $28, honestly not a bad price considering what their other jewelry costs}. Since January is Clay Month here at One Artsy Mama, I immediately started thinking about how I could make my own version of these earrings using Sculpey and rhinestones…here’s how I did it.
Materials:
Some of mine were provided by sponsors like Sculpey, Goody Beads, and ILovetoCreate. Any links to Goody Beads are affiliate links, meaning that any purchase made helps support this blog.
– Sculpey Premo! Accents: Metallics {Gold, Antique Gold, and Silver are what I used}
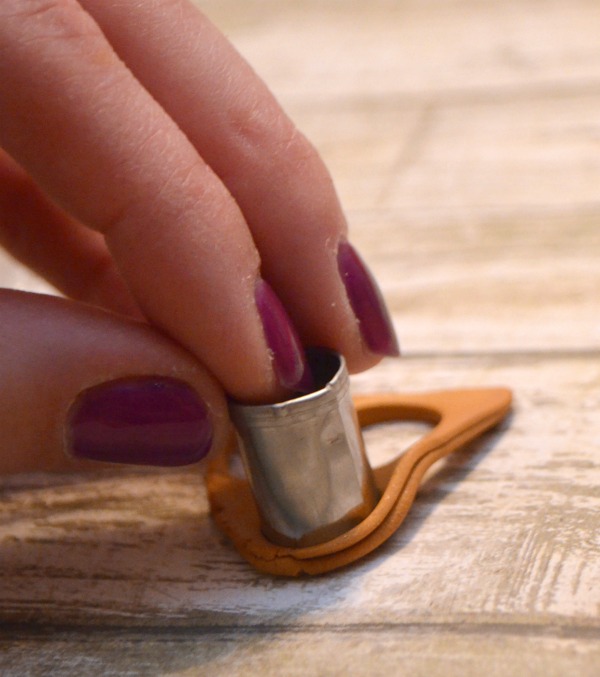
– Sculpey Mini Metal Cutters: Basic Shapes
– Rolling Pin or Clay Roller
– 5 mm or smaller Flat Back Crystal Stones
– Jewel Setter Tool {optional, but very helpful!}
– Foil lined baking sheet
– 6 mm Surgical Steel Post Earrings {also available in gold}
– Earring Backs
– Jewelry Glue or Super Glue
– Aleene’s Clear Gel Tacky Glue

Step 1: Create a small ball of clay and flatten it using your rolling pin or clay roller. I tried to keep the thickness as consistent as possible, about 1/4″. Just a quick note, while Sculpey is non-toxic, it is not food-safe, so be sure if you use a rolling pin that the one you use no longer comes into contact with food after you do this…have one for baking and one just for crafting!
Step 2: Use your mini circle cutter to cut out as many circles as you want. You obviously need two per pair of earrings, but while you’re at it, you might as well cut out a few extras in case you make a mistake or want to gift a pair to a friend.
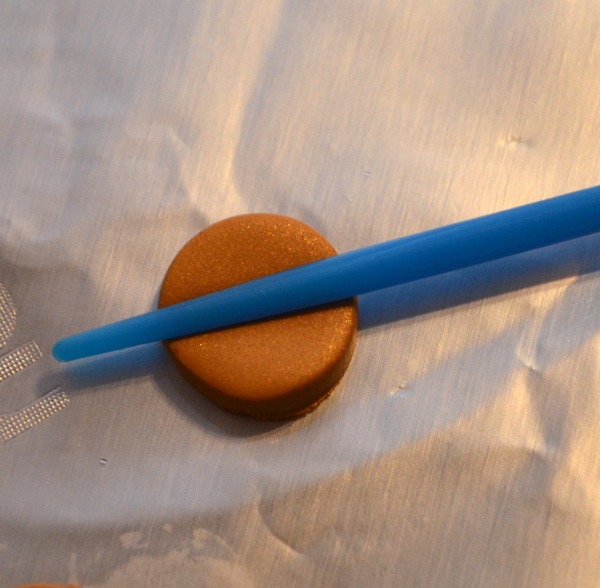
Step 3: Create a horizontal impression in the center of each circle. I used the end of my Jewel Setting Tool to do this, but you could also use a toothpick.
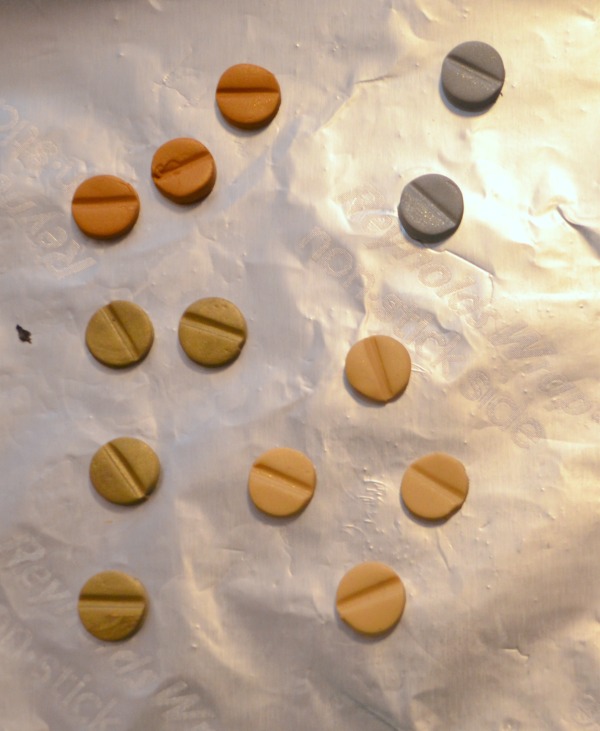
Step 4: Bake your circles on a foil lined baking sheet according to the package directions. I baked mine for 15 minutes at 275 degrees Farenheit. Then, let them cool completely before handling.
You’ll notice that I didn’t just make gold circles, I also made silver and two other shades of gold. I wanted to see how they all turned out and which ones I liked best!
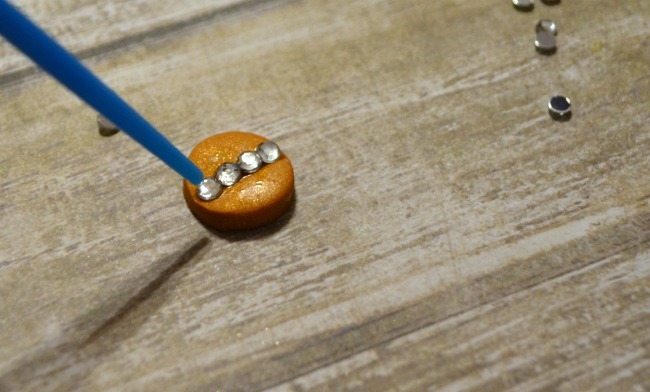
Step 5: Squeeze a thin line of Clear Gel Tacky Glue into the crevice of your circle. Use the Jewel Setting Tool to help you pick up and position the crystals in a row on top of the glue. You can use Super Glue or E6000 for this part too if you want, but I wouldn’t recommend it. It’s almost impossible not to get the glue on your fingers, and I did a lot of repositioning too, so the tacky glue was a better choice.
Step 6: Once the glue is dry and the crystals are firmly in place, flip your circles over and use Super Glue or jewelry glue to attach an ear post to each one.

Once the glue is dry, your earrings are ready to wear! What do you think? Which color is your favorite?


Amy, your earrings are gorgeous! I LOVE them more than Anthropologie’s! 🙂