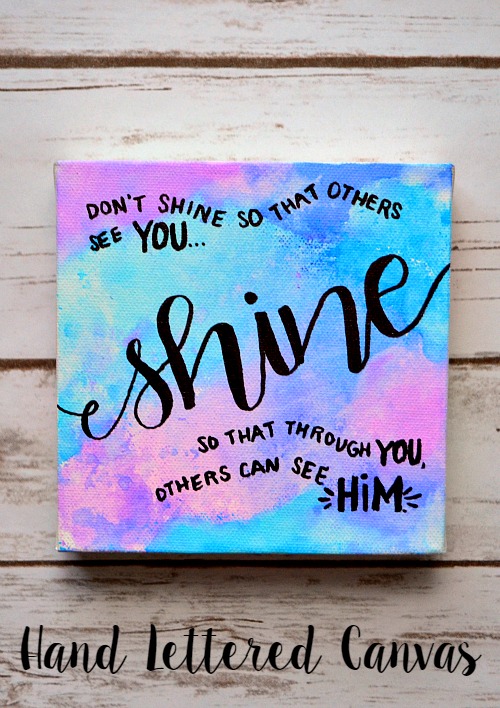
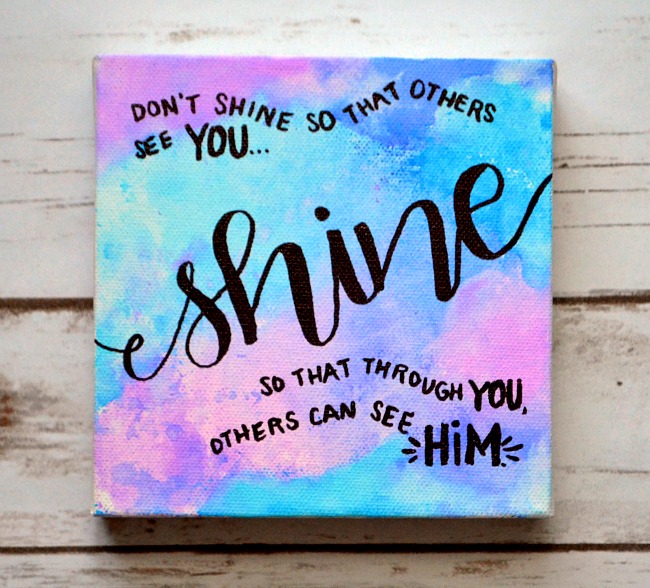
Easy Hand Lettered Watercolor Canvas
Friends, I am SO excited about today’s post because I learned an awesome new trick to share with you! If you’ve ever wanted to create a pretty, colorful watercolor background for your lettering, this is the easiest way I’ve ever seen to do it…and you don’t even need paint. You can get this effect using the Tombow markers I love so much; here’s how!
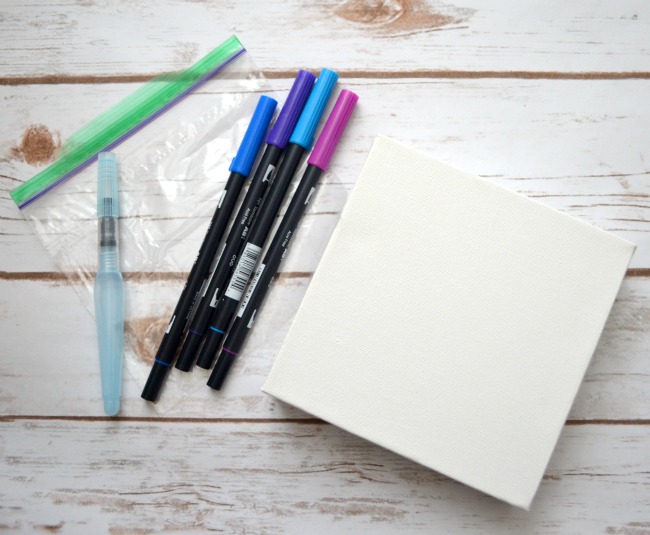
You Need:
A blank canvas {mine is 6×6″}
A plastic sandwich bag
Tombow Dual Brush Pens, your choice of colors
Sharpie Brush Tip black marker
Water
Paper Towels
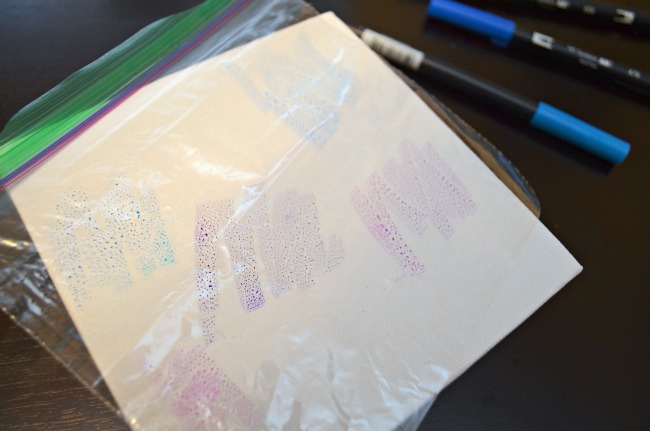
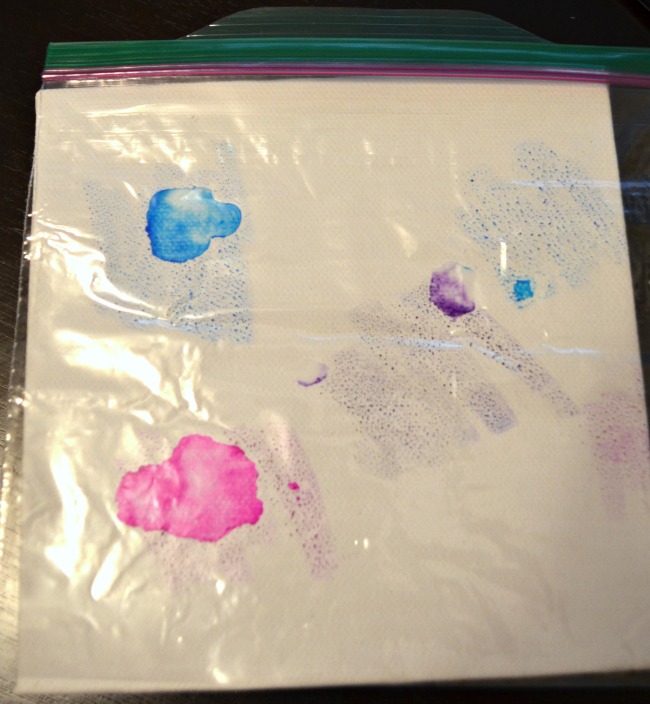
Step 1: Use the brush tips of your markers to scribble on one side of the plastic bag.
Don’t worry about creating a complicated design, just get the areas filled with color.
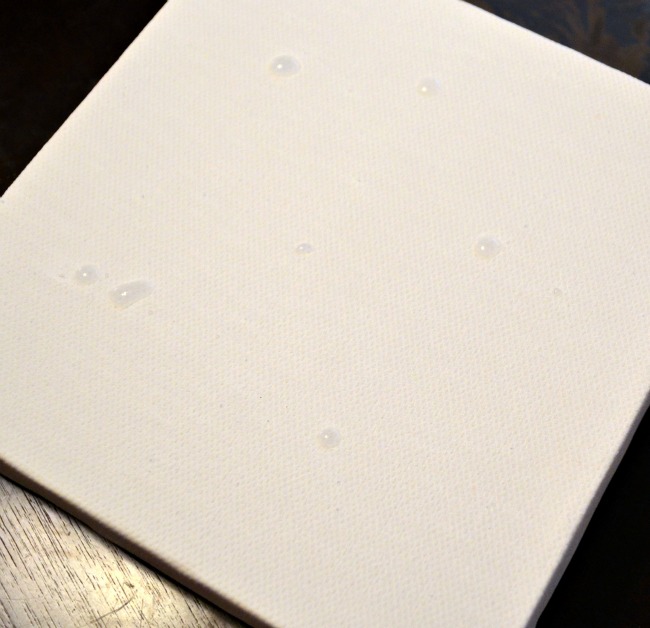
Step 2: Place small drops of water all over your canvas.
I used an aqua pen for this step, but if you don’t have one, simply dip your fingertip or a paintbrush into a cup of water, then touch it to your canvas.
Step 3: Turn your bag over so that the colored side is facing down and press it onto your canvas.
You’ll see the places where the water droplets are start to form pools of color. Continue to press the bag down, rubbing it around a little to transfer the color from the bag to the canvas surface. If you feel there are areas that need more color, you can repeat this step as often as you like until you’re satisfied with the end result.
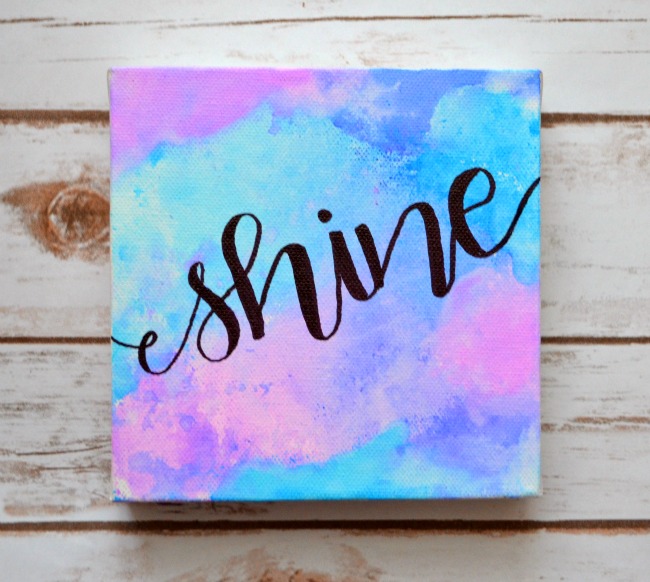
Allow your canvas to dry completely. How fun is that?! It’s so simple and you don’t even need paint, just markers to get this fabulous effect!

Step 4: Use the Sharpie brush tip marker to write “shine” on an angle across your canvas.
If you want yours to have a different word, write that instead. I wanted to create the illusion that my word continued on either side of the canvas so I made my lines go all the way to the edge.
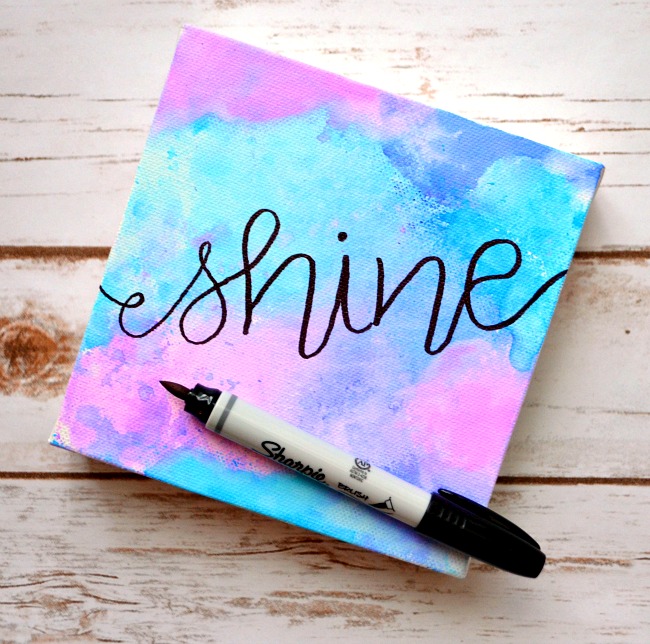
Step 5: Draw a second line on each down stroke.
If you’re brand new to hand lettering, check out my Basic Hand Lettering post for more info on this step.
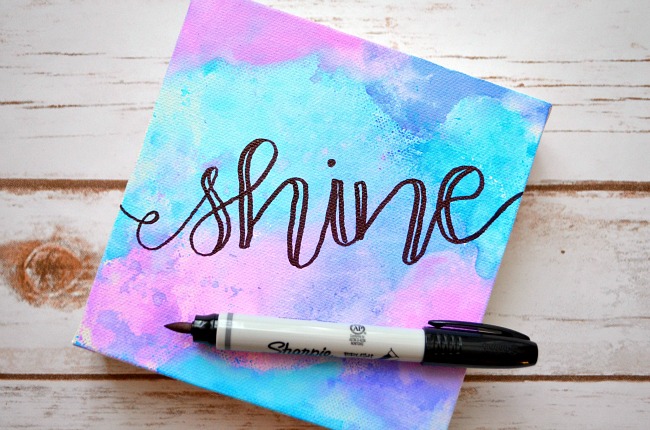
Step 6: Go back and color in the double lines to create the illusion of thickened down strokes.
If you’re loving the look of your canvas as is, you can absolutely stop at this point and let your one word be the focus of the piece. I really wanted to illustrate a larger quote for mine, though, so I kept going.
Step 7: Letter the rest of your quote {optional}.
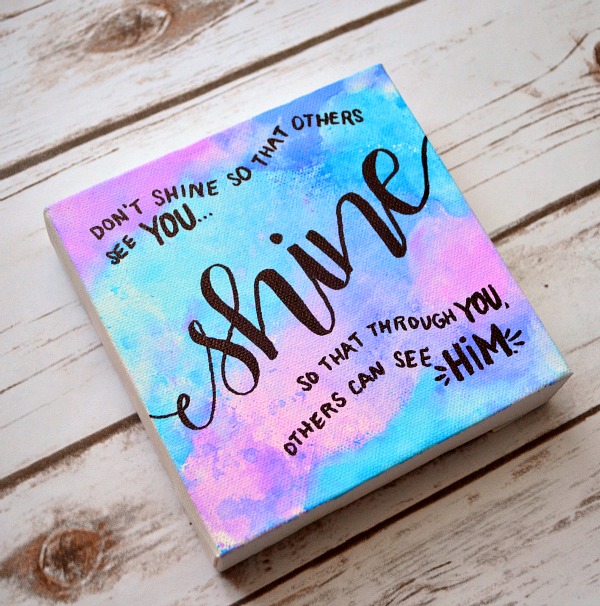
This took me less than 15 minutes to create, and I absolutely love the way it turned out! What do you think? What word or quote would you illustrate using this technique?

What a very cool technique! Great way of making canvas sign with fun background when we do not have paint 🙂 Thanks for the inspiration & tutorial!
Happy New Year!
This is so cool! I can’t wait to try it! Thanks for sharing!
🙂
Ida
Ok, this is too cool! I love it and can’t wait to try it out!
This is SO cool Amy!!! I got a set of the Tombow brush markers for Christmas and I am loving playing around with them, but this technique takes them to a whole new level!
It is so fun! You’ll love it!
What a cool technique! I’ve never seen it before. I’ll have to give it a try! (I found you via Looksi :))
It’s so easy! You’ll love it and want to do it on everything, lol!
Is it really that easy? I have no art skills. But I have a canvas I want to make funky for my wife. So to give her something thoughtful I wanted to create something. I’ve got a canvas shaped in the letter G.
So I’m hoping I can make it funky without destroying it. Where can I get these markers?
Definitely! You can get the markers at Michaels, Hobby Lobby, or online at Amazon and Tombowusa.com. Another option is to do something with Marbling Paint!
This is genius!
Have you tried using parchment paper or wax paper instead of plastic bags? They are more recyclable eco friendly and would have the same effect as the plastic bags. Just a thought.
How cool!!! I love how it looks 🙂 Awesome job!!
Is this a regular canvas? Or something special for watercolors? Thank you!
Just a plain old canvas!
This is awesome!
Quick question-I have limited time to do this and can’t seem to find the markers… what other tools would work with this? Crayola markers? watercolors?
Honestly, I haven’t tried the technique with any other supplies. My best guess would be to use another water-based kind of marker.
I love love this project, thank you for sharing! Hand lettering and watercolor together? Oh yes!
Thanks SO much for stopping by, Jen!!
I love this and can’t wait to try it out! Do u think u could give the canvas a light spray from a water bottle before u lay down the plastic bag and get the same effect?
Sure can! I did that the other day on watercolor paper and it worked!
hey! thanks so much for this! i never drew or did any hand lettering but your tutorials have encouraged me to try it and this is so easy and so fun! if i can do this others can for sure too! thank you!!
Oh, I am so glad to hear it!! Keep on practicing and enjoying lettering!
Do you remember what brand/type of canvas you used and what store you got them at? I tried this on a canvas pad that was pre-gessoed and it was kind of resisting most of the paint so I had to color directly on the canvas then add more water and smoosh it around…i then found out there are watercolor canvas pads but I can’t find any stretched watercolor canvases. Thanks !
It was a canvas from my local Michaels store. I’ve had similar issues before when using watercolors, but it worked okay for me with the markers. I’m with you, it’s hard finding canvases that are good for watercolors, at least in my local stores.
Can we use anything other than the Tombow markers?
Honestly, I don’t know…I have only tried with the Tombows and know that they are water-based and made to blend this way when water is applied.
This is so helpful! I would’ve NEVER even considered getting such a beautiful watercolor design this way!! Thanks for inspiring this Etsy shop owner today!! 🙂
Glad to inspire!
Hi there! I’m wondering if this would work on a white canvas purse?! Thank you! Laura
It should!
Is the canvas used normal? I have normal oil painting canvases, will they work?
Sure will!
Thank you for your generosity, Amy. I was looking for a brush lettering stroke that I like, and you provided me with the upper and lower case lettering for free! You are a kind soul, thank you so much.
Wonderful! I am so glad to hear it!
Maybe because I used the flat canvas vs the one you used but this did not look anything remotely like what you did. I followed everything you did but used different canvas and no! I managed to salvage my watercolor and the idea was good however the rest not so much. A video would be nice to see everything you did because I feel steps are missing to get the canvas to be filled in as yours….or even remotely similar.
All in all, this was a huge life saver and it was fun!!