Dr. Seuss Quotes on Canvas
Have you ever done a project that made you want to repeatedly hit your head against the wall? Thought so. Be forewarned, what I’m going to share with you today was that kind of project for me. I’m pretty sure I’ve never said this before in the history of One Artsy Mama, but you probably don’t want to try this one at home. You can if you want, but if you want to keep your sanity in tact, just ooh and ahhh over mine and then go order some printables on Etsy instead. You’ll thank me for it. Now. On to the project.
Dr. Seuss Quote Canvases

TIME REQUIRED: Way too much
SPECIAL TOOLS: Silhouette cutting machine
SPECIAL SKILLS: Excessive amounts of patience and persistence
Materials:
– 16×20 canvases
– acrylic paint and paintbrushes
– white adhesive vinyl
– transfer paper
– Silhouette cutting machine and software

Let me start by giving you the background for this project. Our church recently celebrated its 10th birthday and simultaneously decided to do a major renovation upstairs. That meant Cammie {my trusty Silhouette Cameo} and I were commissioned for a few special projects, including the gi-normous wall art I shared with you the other day. Since the nursery was totally redone and a new room was constructed for 3 and 4 year olds, those rooms needed to be decorated too. While brainstorming with Sheri, the coordinator of the kids’ program, we came up with the idea of doing a Dr. Seuss theme for the older children. We saw a cute set of printables featuring fun Dr. Seuss quotes on Etsy, and being the overly ambitious Artsy Mama I am, I decided we’d make our own signs using canvas and Cammie. Why not, right?
Step 1: Paint each canvas a different color. Sheri actually did this part for me. She did a great job, making them bright and well covered. She got the easy job. Then it was my turn.

Step 2: Design and cut each quote using the Silhouette Studio Designer Edition software. Again, this part was easy. I just typed each line and used the grid lines provided to make sure everything was the same width. I had to do two separate cuts for each quote since they were more than 12″ long, but again that wasn’t a problem.
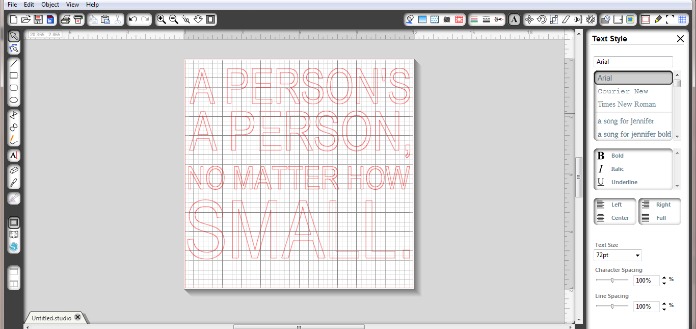
Step 3: Transfer the letters to the canvas. This was the part that made me want to scream and yell and kick things. Honestly. I’ll tell you why.

I assumed this would be just like any other vinyl project I’ve done. Lay a piece of transfer paper over the letters, peel it up, place it on the canvas, then remove the transfer paper and leave the letters behind. Right? Wrong. The problem, you see, is that apparently, vinyl letters don’t find painted canvas to be a nice home. Unlike when I have applied adhesive vinyl to walls, wood, glass, and other surfaces, this was a nightmare. The letters did not want to stick to the canvas, no matter what I did.

I pressed, I rubbed, I pressed some more, then pulled the transfer paper up, and up came the letters too. So, painstakingly, one at a time I worked to free each letter and convince it to stick on the canvas. Just in time to have the sticky paper contact it again and pull it back up. Every time I’d get a few letters in place and go to work on another one, the previous ones would jump back up to the transfer paper with a will of their own. It was mutiny. Each one of these canvases seemed to take longer than the one before it. And the teeny tiny letters were the worst of all. Some vinyl got twisted and ripped and needed to be re-cut. Some had to be placed by hand so it’s not quite straight. And still, the letters aren’t totally, permanently stuck. If one kiddo gets a finger underneath them, it’s history. This project seriously drove me nuts. I don’t want to see another piece of vinyl or transfer paper for at least six months. Honestly. Arghhh!
So, if you’re inspired and you want to give it a go, by all means do, but don’t say I didn’t warn you! I do love the way they turned out; I think they’re super cute and will look adorable in that room…but they better use them forEVER!


Thank you for #honestly sharing your crafting frustration. Just curious about using vinyl on a blank canvas. Does it stick then so you can use it as a mask? I thought that’s how you were able to do your honestly watercolor.
I despise sticking individual tiny letters down. I bought a fun quote to put on a tile a while back. I found a tile I liked and went to stick everything down. Those letters drove me nuts! I’m not sure if it was the letters or the tile surface or just what made them not want to stick. I did finally get everything stuck down, but lots of the letters are slightly crooked and I honestly don’t love the tile like I thought I would because I see the imperfections. Ironically, part of the quote encourages being patient with yourself!
I’m sorry the letters fought with you Amy because the outcome is ADORABLE! I am a HUGE Dr. Seuss fan…even at my age, every time I see ANYTHING Dr. Seuss I go nuts over it! Anyway, regardless of the struggle, you did a great job! 🙂
Did you consider using a top coat of protective spray? It might help them last a little longer with all those prying fingers.
Mod Podge is your friend when preparing canvas for vinyl lettering. They look adorable, and I’m sure your efforts will be greatly appreciated!
Ooh, good call, Randi!
Maybe put mod podge on top to seal the letters down?
They turned out great…I’m sure they will look great in the classroom…
Great colors and quotes. 🙂
I think if I attempted this project (or something similar), I would just paint on the letters. Take the easy way out. Your signs came out really cute though!
Love how they came out! They are so pretty!! Thanks for your honesty.
I am working on a similar project for our house… and have been for over a year. I work on it for a while and get frustrated enough I have to take a break. Like for months at a time! I have 13 canvases I’m painting and I’ve only finished 5… I feel your pain on this. However, your canvases turned out fabulously. I love the colors and the quotes are fantastic, especially for a nursery. Awesome job and way to persevere!
Thanks, girl! If they’d been for me/our house, I’d totally have quit, lol.
I could hug you for how real this post is! And how funny, too! Seriously, I love how you purposely keep everything very real on here! (And the canvases look great, by the way!)
Did you try the permanent vinyl that pick your plum has today?
Omg this was the poem we had to read in my grade 8 graduation.