Teacher Appreciation Gift

As most of you know, Little Crafter started school this past fall, and we could not love his teacher more! Mrs. W. is such a blessing to our family, and has made the transition to school a pleasant and fun one for a little guy who wasn’t so sure about the whole deal. She’s amazing with the kids and she does a great job of identifying and meeting their individual needs, whether they’re gifted in an area, need some extra encouragement, or whatever it might be. The “official” Teacher Appreciation Week isn’t until May 5-9, which seems like a long time to wait to show her how much we appreciate what she does in the classroom every day for Little Crafter and his friends. So, I don’t think we’re going to wait to give her this little gift we created. It’s just a spring-y reminder that we are grateful for all her hard work.
 Here’s how we made it…
Time: 10 minutes {excludes drying time}
Difficulty Level: easy/beginner
Special Skills: none
Special Tools: none
Materials:
{I received some of these free of charge from various manufacturers; all opinions are my own}.
– small terracotta flower pot
– Folk Art multi-surface paint, Orchid Blossom
– Martha Stewart metallic paint, Titanium
– Aunt Lydia’s Baker’s Cotton: purple
– sponge brushes
– seed packets
– cardstock, scissors, and crayons
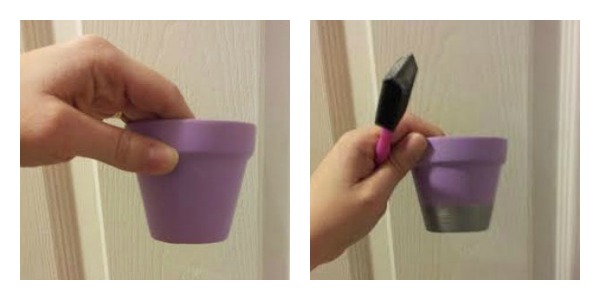 Step 1: I painted my entire pot purple and let it dry. I was amazed at the coverage of this paint; typically, I need to do multiple coats of paint on top of terra cotta, but this covered like a dream and was finished with just one coat.
Step 2: Paint the bottom third of the pot with metallic Titanium paint. {*Honestly moment: My original plan was to tape this off with painter’s tape and paint below the line, like I did for my IKEA vases. But the pot tapers, which means that was impossible to actually do. Fail. So, instead, I just freehanded it by painting the width of my sponge brush. It’s not totally straight…which is why I added step 3!}

Step 3: Wrap Baker’s Cotton around the spot where the two colors join. I wrapped mine three times, then tied it off.
Step 4: Fill with seed packets and a special message for the teacher! I cut a piece of card stock and told LC to draw Mrs. W. a pretty purple flower, which he gladly did. Then, I just wrote, “Thank you for helping me grow!” at the top of the paper. Teachers, like moms, love handmade art, right? Mrs. W. even has a “love binder” where she keeps all the pictures and notes her students make for her.

It’s just a little something, a little reminder of spring and of our appreciation. Do you have a teacher you appreciate? This week, a bunch of bloggers I think are pretty awesome will all be sharing various ideas for quick and easy gifts you can make as part of this month’s Craft Lightning Blog Hop! Be sure to take a look at some of those too and be inspired!


Love the two toned pot!
What a cute idea!! I don’t think I could wait til May to give it to her either. She needs to be able to plant the seeds now that Spring (hopefully) will be here soon. We actually are having beautiful weather. We are in the 70’s and sunny. Whoop! Whoop!
What a great gift for teacher, friend- anyone. Love it!
I’m sure Mrs. W loved this gift from your little crafter! May really IS too long to wait to let teachers know how much we appreciate them!